Reviewing your Settings on the Tebi App
Here we’ll go through how to adjust (i) your business address, (ii) the type of service, payment and Floor Plan, (iii) the language, (iv) the address and logo printed on your receipts, (v) your customer-facing display, (vi) QR ordering options, and (vii) adding users in the app.
Profit Center
If Profit Centers have been enabled, the selected Profit Center for this device will be visible in the Settings menu. At the very top is a drop down with you Profit Centers.
Click on the Profit Center name to select another profit center.
About
In the app, go to Settings, then About.
Business address
To change your business address:
- Fill in your business address in the Merchant info section.
- By default, this is the address used on your receipts.
Accounting settings
This is also where you will find your Accounting settings (e.g., base currency and tax rates), based on the information provided during the onboarding process.
Device information
This is also where you will find your Device info, like device ID, name and operating system.
Preferences
In the app, go to Settings, then Preferences.
Type of service and Sale Screen settings
- The Sales mode can be determined at device or profit center level. Device level overrides profit center level.
- Go to Sales mode > This device and select:
- Counter sales if customers order from you directly and pay before service. When the sale is completed, the next sale will start automatically. Useful for retail stores, bakeries and coffee stands;
- Service sales if you are serving multiple customers with the same device at the same time. You can start a payment and can move on to the next sale while payments are in progress. Useful for cafes and restaurants with multiple staff member and limited POS devices; or
- Default: Profit Center default is service sales. This overrides the Profit Centers default setting on this device.
- Scroll down to the section Profit Center Default and select Counter Sales or Service Sales. Switching default sales mode will immediately change sales mode for all devices in the profit center, unless the device the default has been overridden at device level (above).
- Go to Sales mode > This device and select:
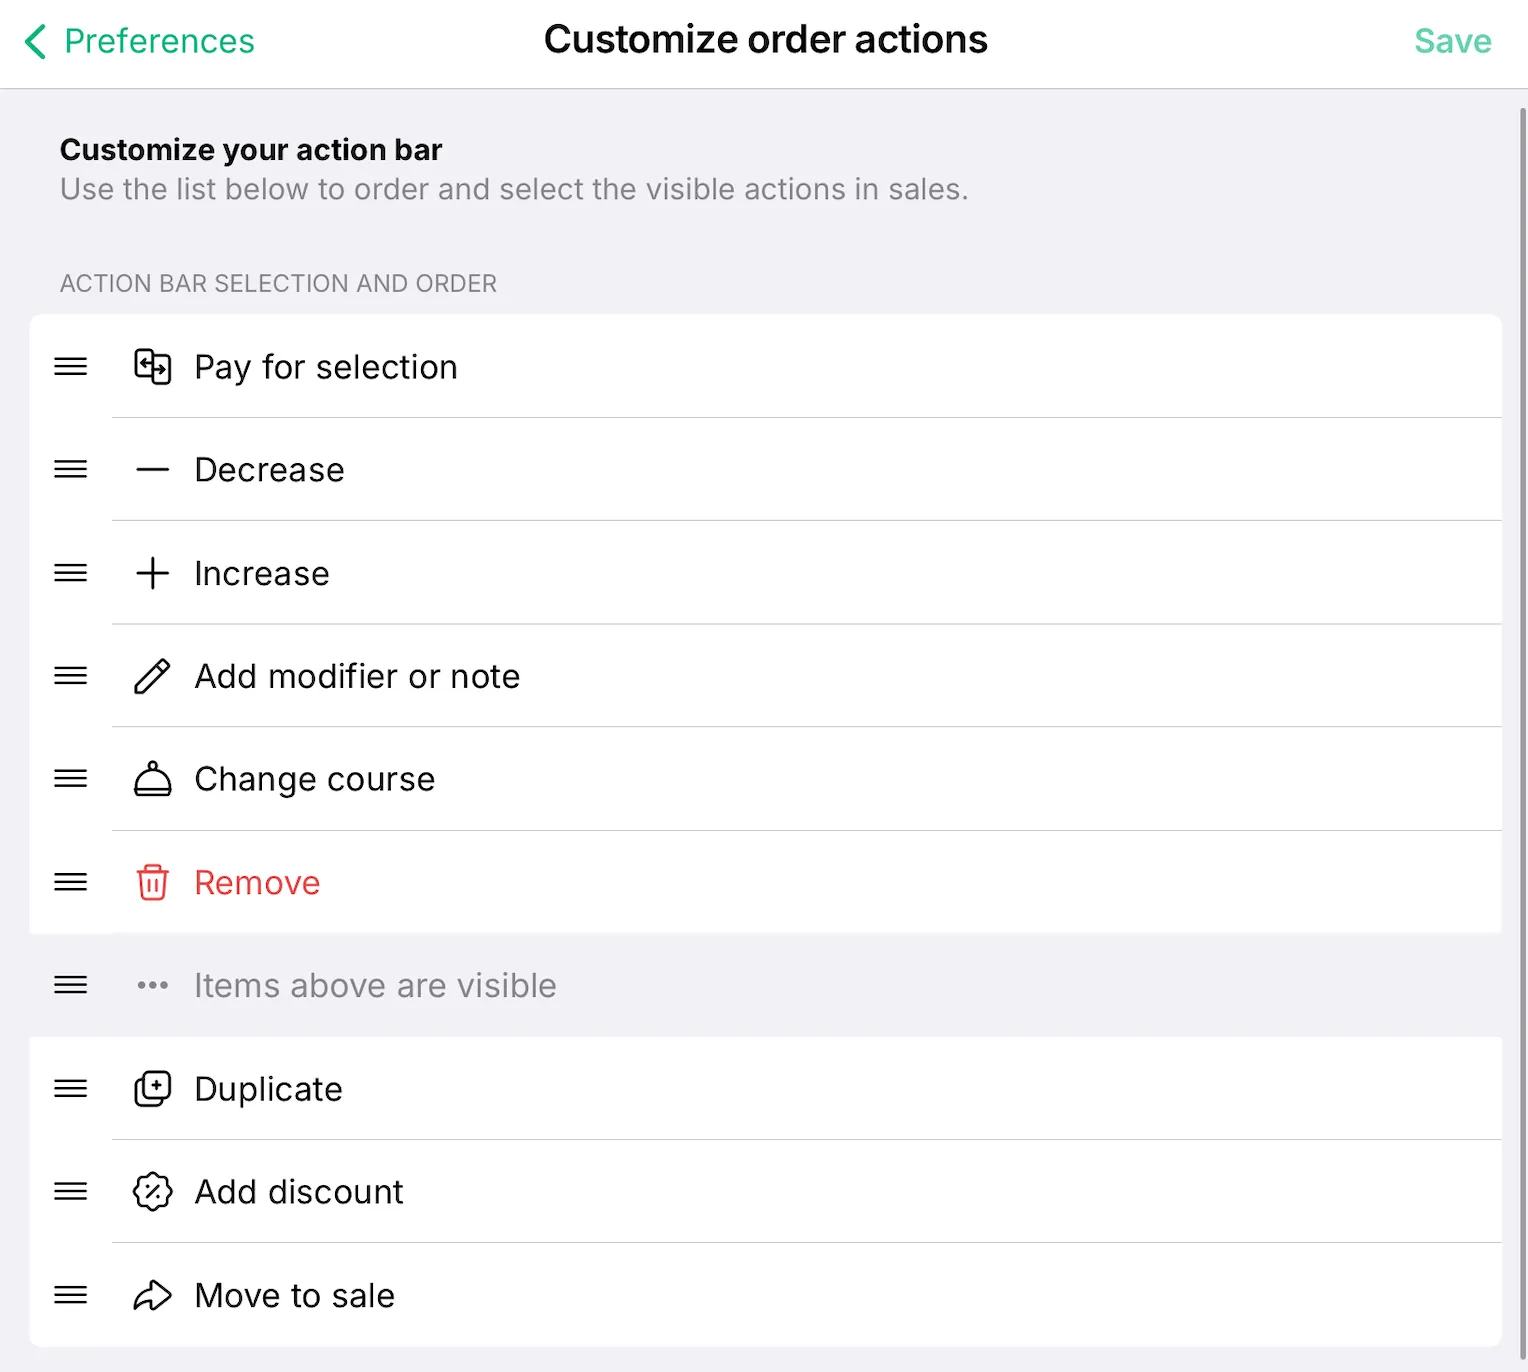
- Customize order actions for a quicker way of managing your sales. Drag & drop the most used action items to the ‘Action bar selection and order’. This selection is shown if you want to edit a sales.
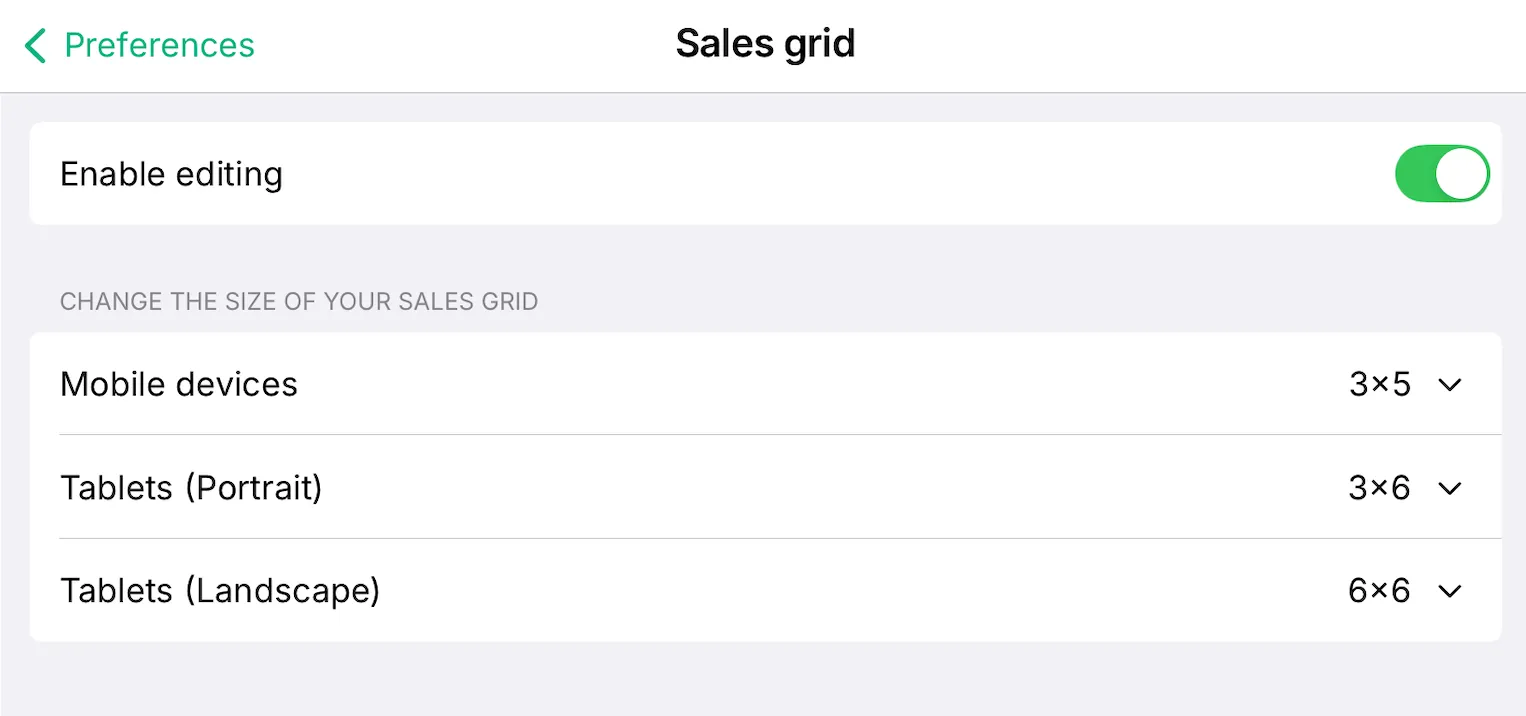
- Change the size of the Sales grid depending on the type of device and orientation (portrait vs landscape).
-
Turn on the Prompt customer name for new sale switch to make adding a customer name to each sale a requirement.
-
Enable the Prompt table number for new sale to require a table to be selected before creating a sale.
-
Covers - Prompt number of covers for new sale. This means you and your staff will be required to add the number of guests when creating a new Sale, unless the sale is a reservation that has been checked in. This is to keep track of covers, also view your Cover Report the next day in the Back Office for more detailed information.
-
Enable seat numbering when taking orders.
- Use the arrows in the Sales order to move between seats when adding products.
- The seat number will be added to a product as a note and will be sent to to the prep station.
-
Turn on the Set the last used product grid tab as default switch if you want to return to the same Sale Screen that you last used when adding a product to your invoice. If the switch is turned off you will return to the first Sale Screen by default.
-
Turn on the Dismiss sale after submitting an order if you want the Sale to close after submitting an order.
-
Turn on the Dismiss Sale after a full payment if you want the Sale to close after a full payment.
-
Via View modifiers you can select your preferred view. List or Compacy Grid. Read more about the View modifiers.
Payment preferences
- You have the option to turn on the Ask for tip on payment terminal switch**.**
- When enabled, set the Sale amount threshold. The tipping options will only show if the payment is above this amount.
- Select receipt type after payment options Print or QR code. * The selected receipt type will be automatically prompted after payment.
- By scanning the QR code you will receive the invoice as a PDF document.
- If you selected Print as the preferred payment option, you can still view the digital receipt by clicking on the three dots on your invoice screen and clicking on View digital receipt.
- Select Quickpay options Card, Cash or Online payment (if enabled)
- Follow these steps to enable QR payments.
Floor Plan preferences:
- Use Show amount due on Floor Plan to show the amount remaining for sales on the Floor Plan card
- Show sale notes will use the content from a sale note as the title for a Floor Plan card
- When Allow invoices outside tables switch is turned on, a sale must be added to a table when it is created and moved on the Floor Plan. Otherwise sales can be created anywhere in the Floor Plan.
- Show reservations on tables will display information about upcoming reservations on the Table Grid
- Show sales toolbar displays a shortcut toolbar with access to upcoming reservations and other sales on the Table Grid
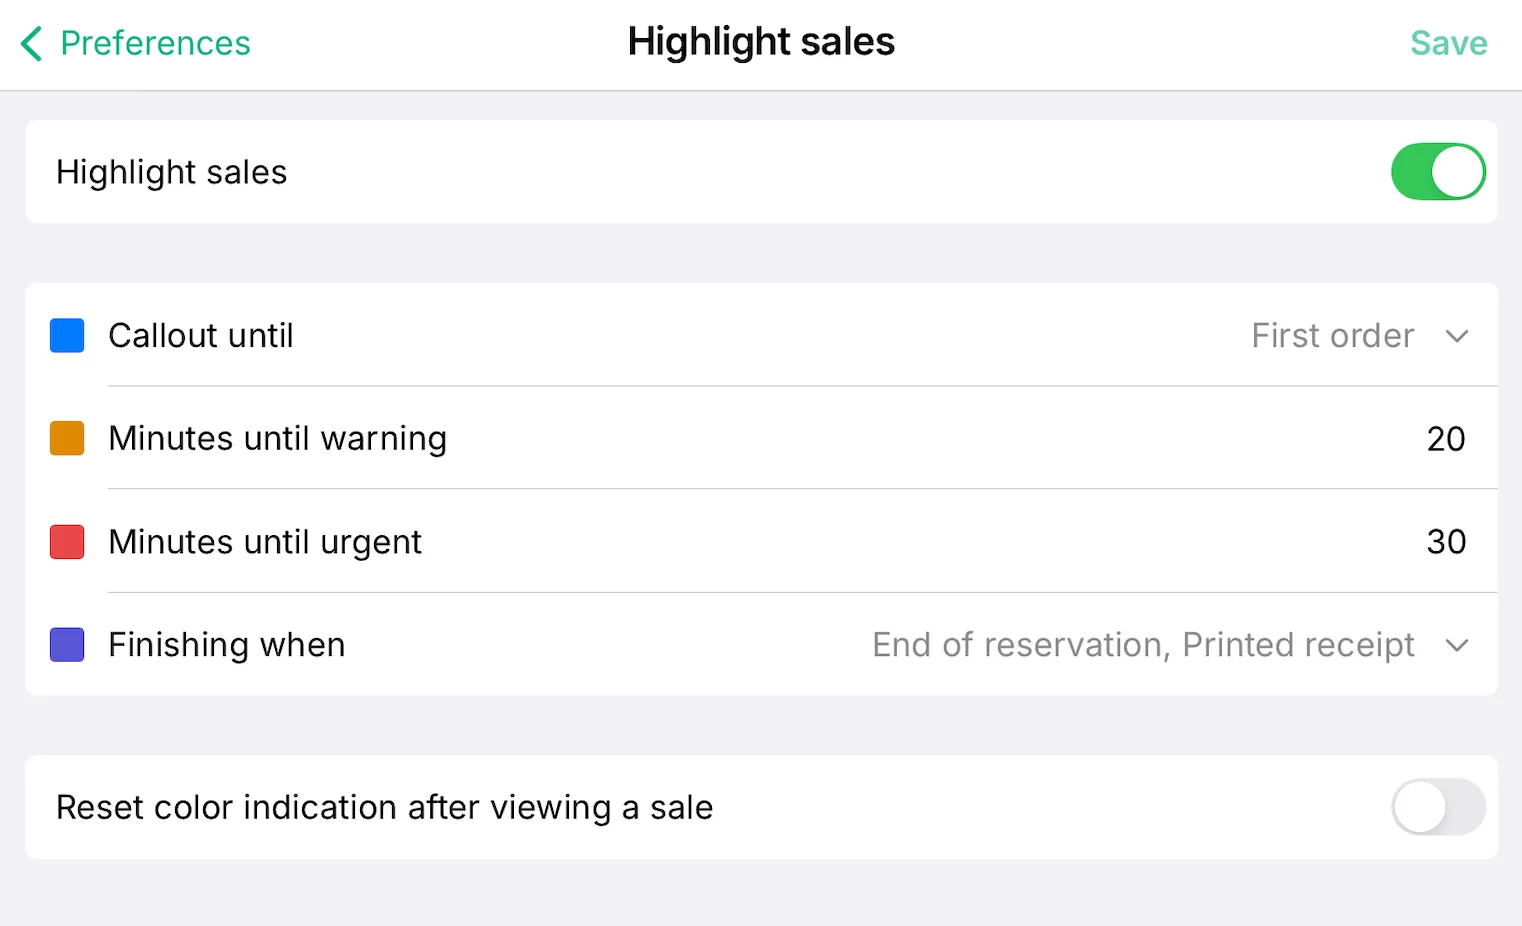
- Turn on the setting Highlight sales to display that sales have not been opened in a while. This is visible in the Table grid and on the Floor plan.
- Callout until: Sales will be outlined in blue until the first order is submitted on the sale. This can be used to see when guests have just arrived.
- Minutes until warning: ** ** Sales will be outlined in yellow (warning) based on the times you set.
- Minutes until urgent: Sales will be outlined in red (critical) based on the times you set.
- Finishing when: Sales will be outlined in purple when the reservation time is up or when the receipt is printed for the guest to review.
The appearance:
- Tap Theme and select on the theme options
- Use device settings - This will choose light or dark mode depending on the device settings. Usually light mode in the day, dark mode at night.
- Light mode - Uses a brighter colour palette which helps reduce glare
- Dark mode - A darker theme which will stand out less in low light or dim lighting
- Choose to show or hide the System navigation. This refers to the Android bar that displays important apps and the back button.
- To enable sound: switch off the Mute toggle.
Language
To change the language and date formats used in Tebi go to Settings, then Language.
- Select Device settings to make changes in the app your staff use or Customer-facing settings to make changes to the customer-facing display.
- Turn off the Use systems settings switch to:
- Select the Language you would like to use (only Italian or English are available at the moment)
- Select the clock style and
- Select the Date/time style: month or day first
Note: Changing the language of your Back Office is possible if you add the following url to your Tebi Back Office url: ?lang=nl for Dutch and ?lang=en if you want to change back to English.
Inventory
Start by setting up the basics of inventory management with this quickstart guide. Click here for more information on inventory.
Terminals
For more information on how to set up your payment terminal, go to the article Setting up a payment terminal.
Tap to Pay
See the following articles to set up Tap to Pay:
Printing
To add a logo for use on your receipts and in the customer-facing display or change the address shown when printing receipts.
In the app, go to Settings, then Printing.
Printer selection
- Press Printer selection and find the available printers. learn how to connect your printers here.
Receipt customization
- Update the address in the Receipt customization section.
- Update the message shown at the bottom of the receipt in the Tagline section.
- Upload a logo by pressing Upload business logo.
- Turn on the QR payments toggle if you would like to show a QR Payment code on receipts.
- Print a ticket number on receipt. You have the following options:
- Disable (ticket number will not appear on receipt)
- Two digits
- Three digits
- Show name of staff member on the receipt or prep station ticket
- Show or hide product and sale notes on receipts
- Turn on the Show the payment receipt toggle to print payment receipts
- Mute prep ticket errors to mute error messages forever
Prep stations
For more information to add prep stations, go to Adding a Prep Station.
Customer-Facing Display
Let’s setup a customer-facing display.
QR Ordering
Two adjustments to your QR ordering can be made here to help you run a more smooth QR service:
- Allow guests to order from the online menu by turning on the toggle
- Selecting which payment method you want for your various areas: either before or after service.
Users
To add users and set user roles:
- In the app, go to Settings, then Users.
- Tap Add User ⊕︀ in the top right corner.
- Fill in the user details.
- Role: select the desired level of access this user will be granted in the app. View permissions granted to roles.
Go to the article User access for more information on the Access control settings.
Exit Ledger
Switch between multiple Tebi accounts on your personal devices, without having to log in again.
- Turn on the This is a personal device toggle in the account selection screen
- Go to Settings > Exit Ledger to quickly switch to your other accounts
Sign out
To leave the Tebi App:
- Go to Settings > Sign out to exit the Tebi App