Managing reservations
Viewing reservations in the Tebi Back Office
There are multiple ways you can view your reservations, in the form of an agenda per day, a timeline or weekly overview.
Agenda
- Go to Reservations > Agenda.
- Use the date selector to find the date you are interested in.
- Returning guests are highlighted with a circled number indicating how many reservations are linked to their account.
- You will see a list of any reservations for that date including the notes from the guests.

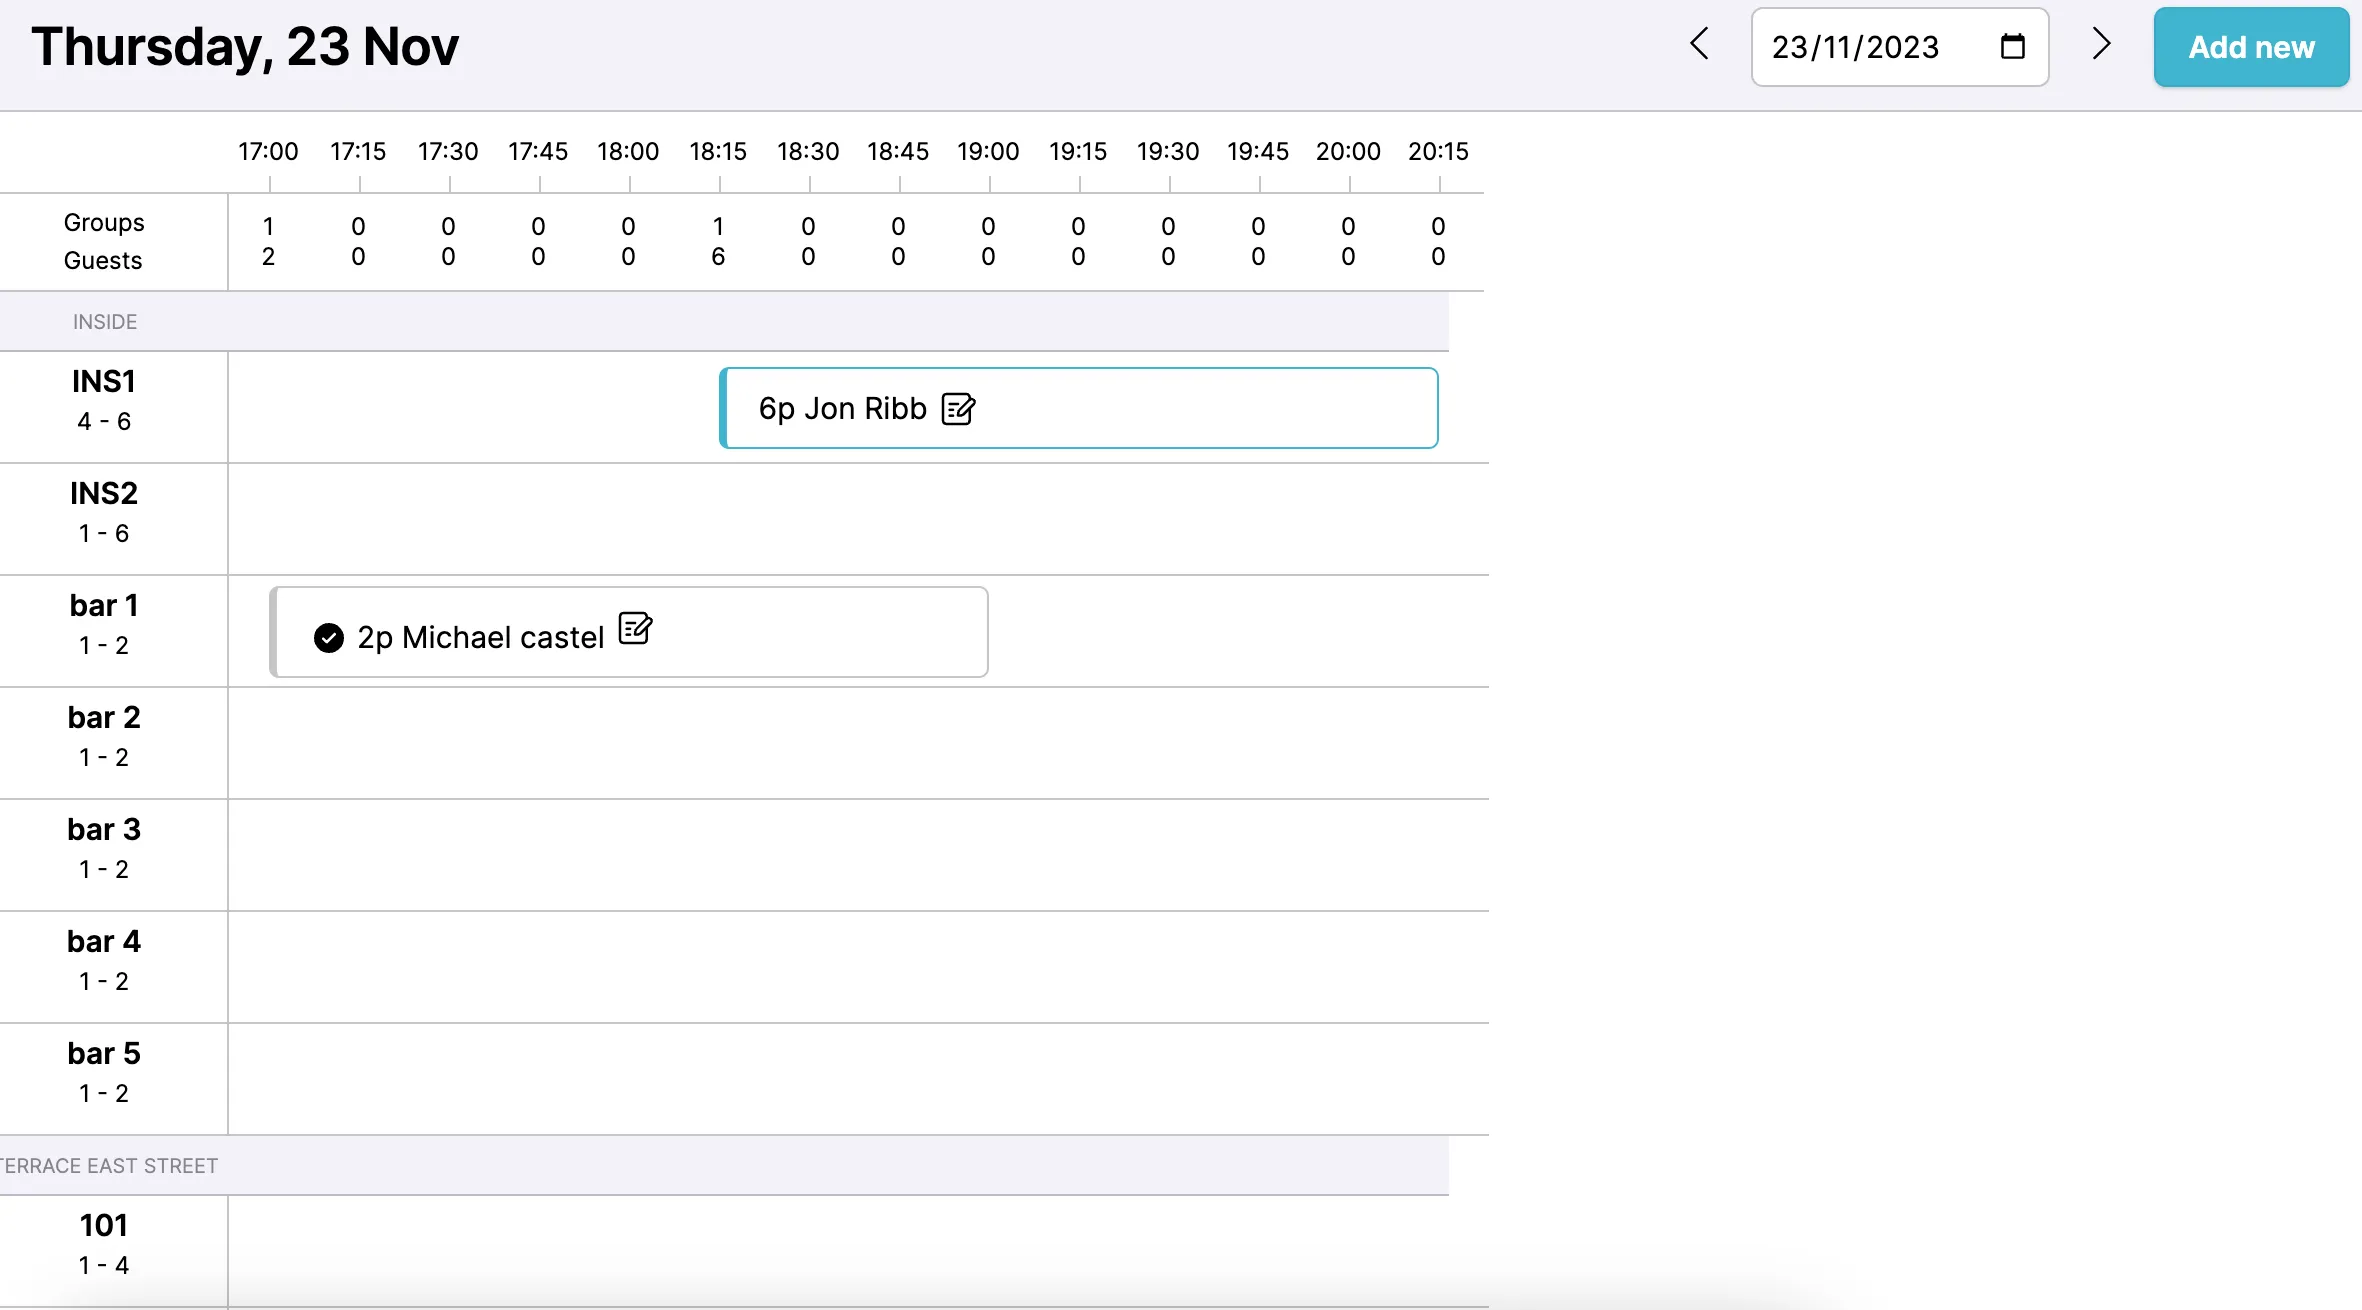
Timeline
- Go to Reservations > Timeline.
- Use the date selector to find the date you are interested in.
- Returning guests are highlighted with a number indicating how many reservations are linked to their account.
- You will see an overview of the reservations in the form of a daily schedule timeline.
- Click on the guest’s name to see the details of their reservation.
- Rearrange seating plans with the drag and drop feature.
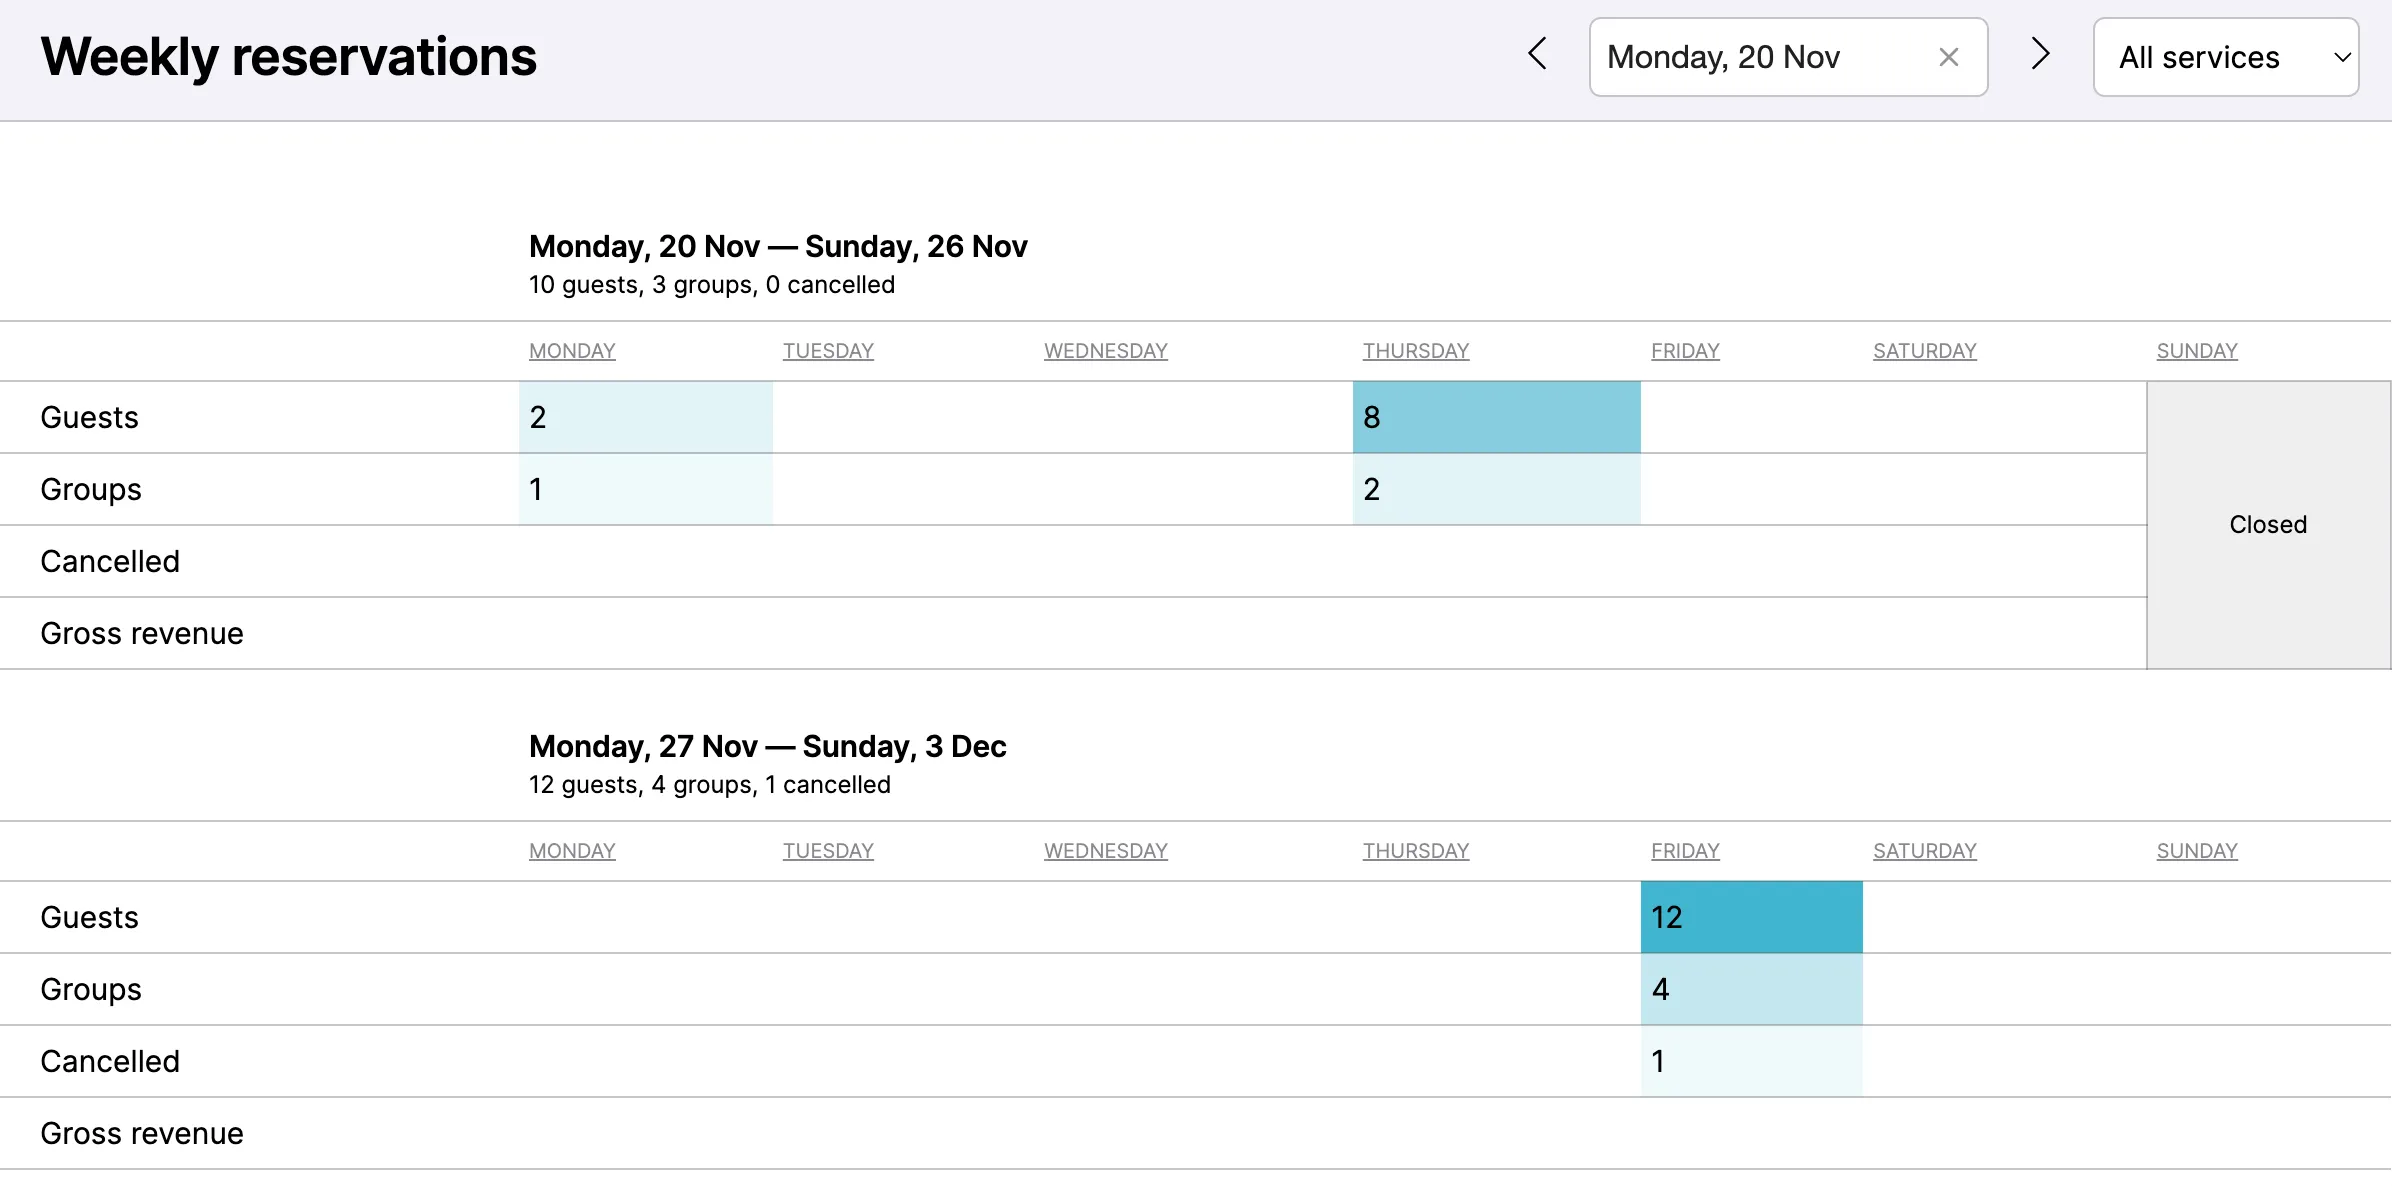
Weekly
- Go to Reservations > Weekly.
- Use the date selector to find the date you are interested in.
- Use the filter (optional) to select the service(s) you want to see the reservations for.
- You will see a weekly overview with the number of reservations per day.
- The amount of canceled or no-shows reservations are also listed here.
- If you use Tebi Payments, the gross revenue of a day will be listed at the end of the day.
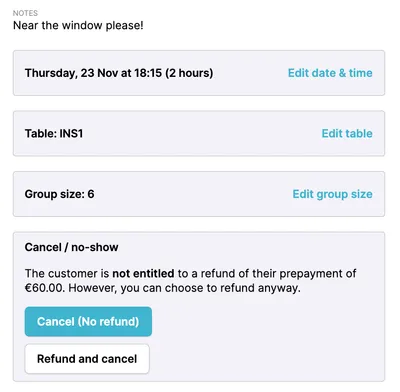
Adjusting reservations in the Tebi Back Office
- Go to Reservations > Agenda or Timeline.
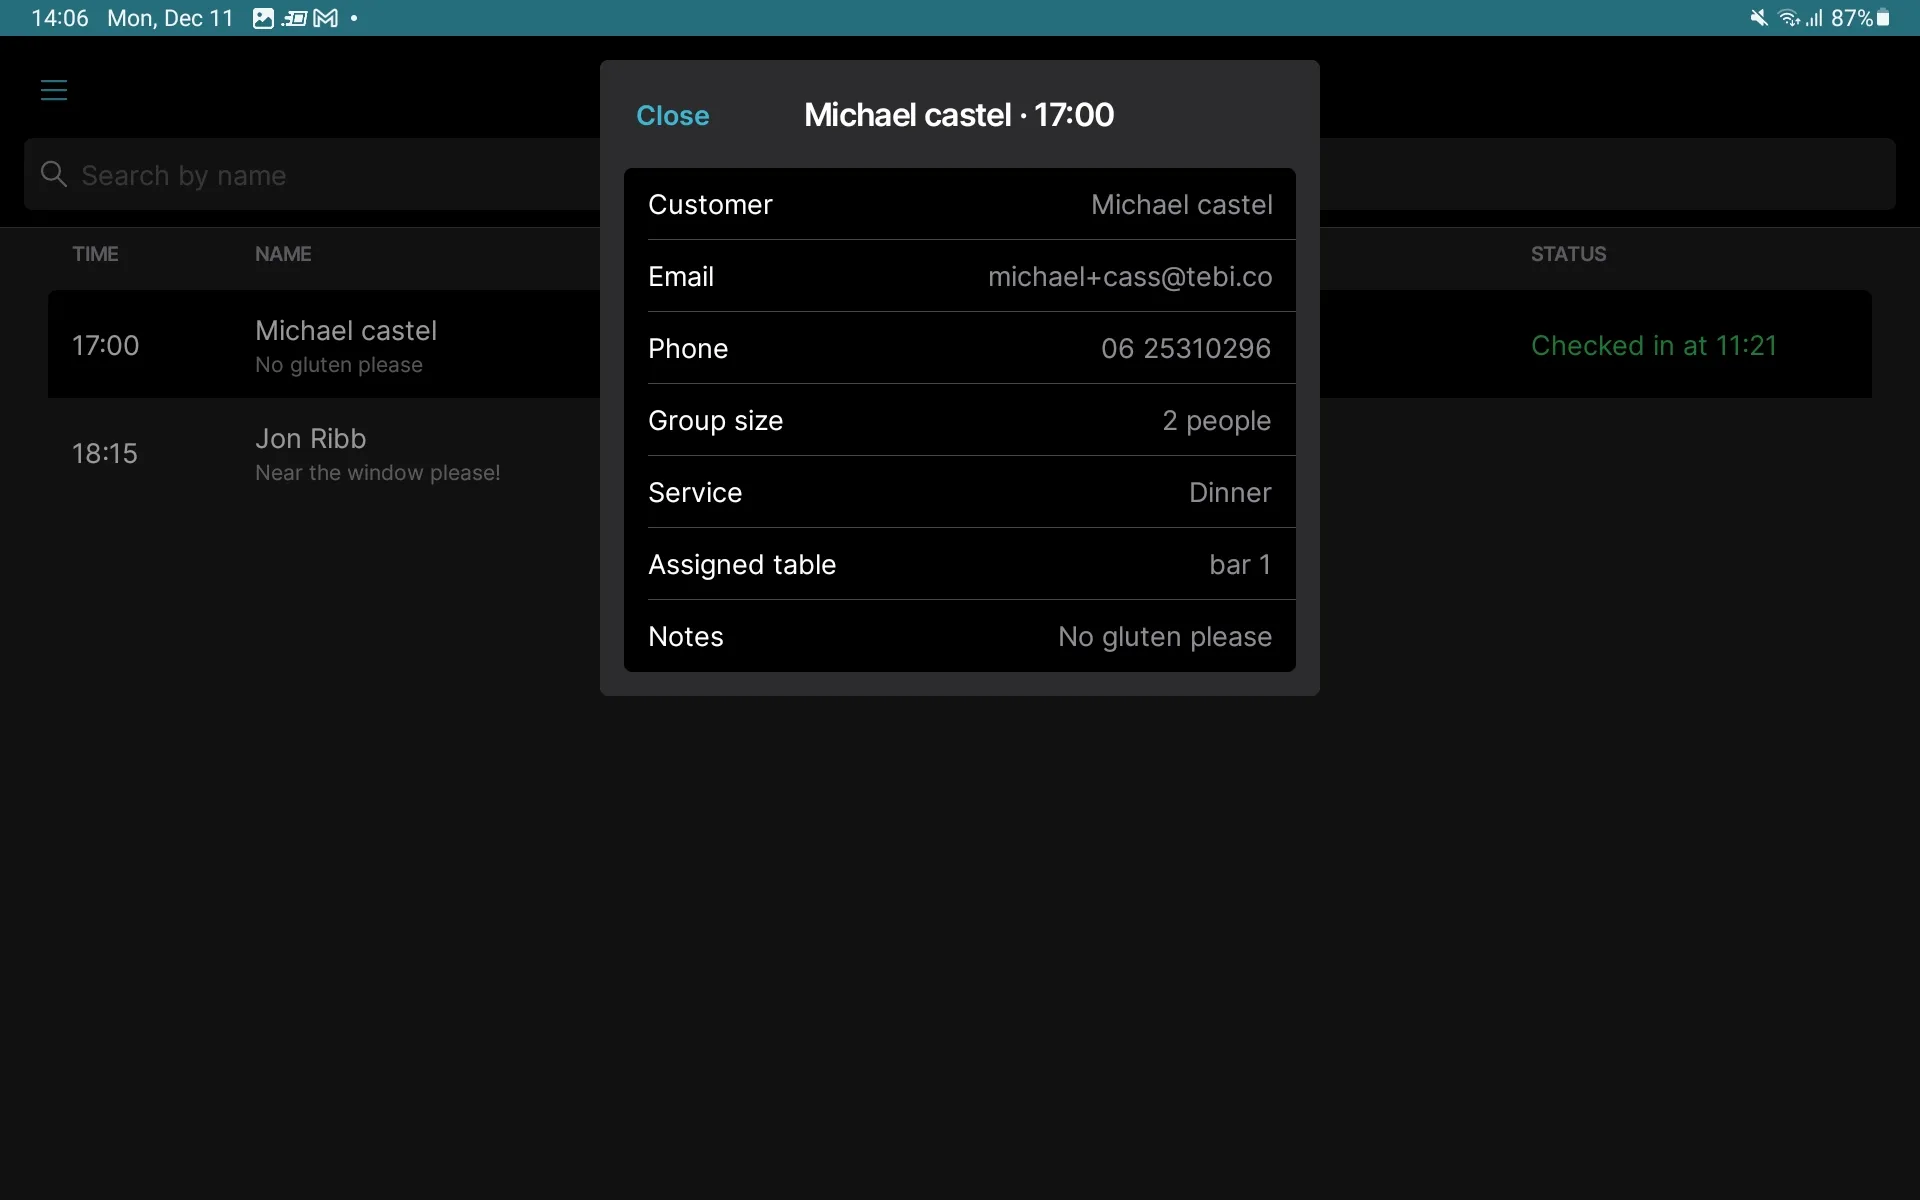
- Find the reservation you want to adjust and click the customer name.
- You can change the reservation date and time, adjust the table they have been assigned to, adjust the group size, cancel their reservation and refund their prepayment.
- Note: you have complete control here and can override the system in all aspects including seating people in ways that would otherwise be an overbooking.
Creating new reservations in the Tebi Back Office
- Go to Reservations > Agenda or Timeline.
- Click Add new.
- Add in the details of the customer making the reservation and save.
- Note: you have complete control here and can override the system in all aspects including seating people in ways that would otherwise be an overbooking.
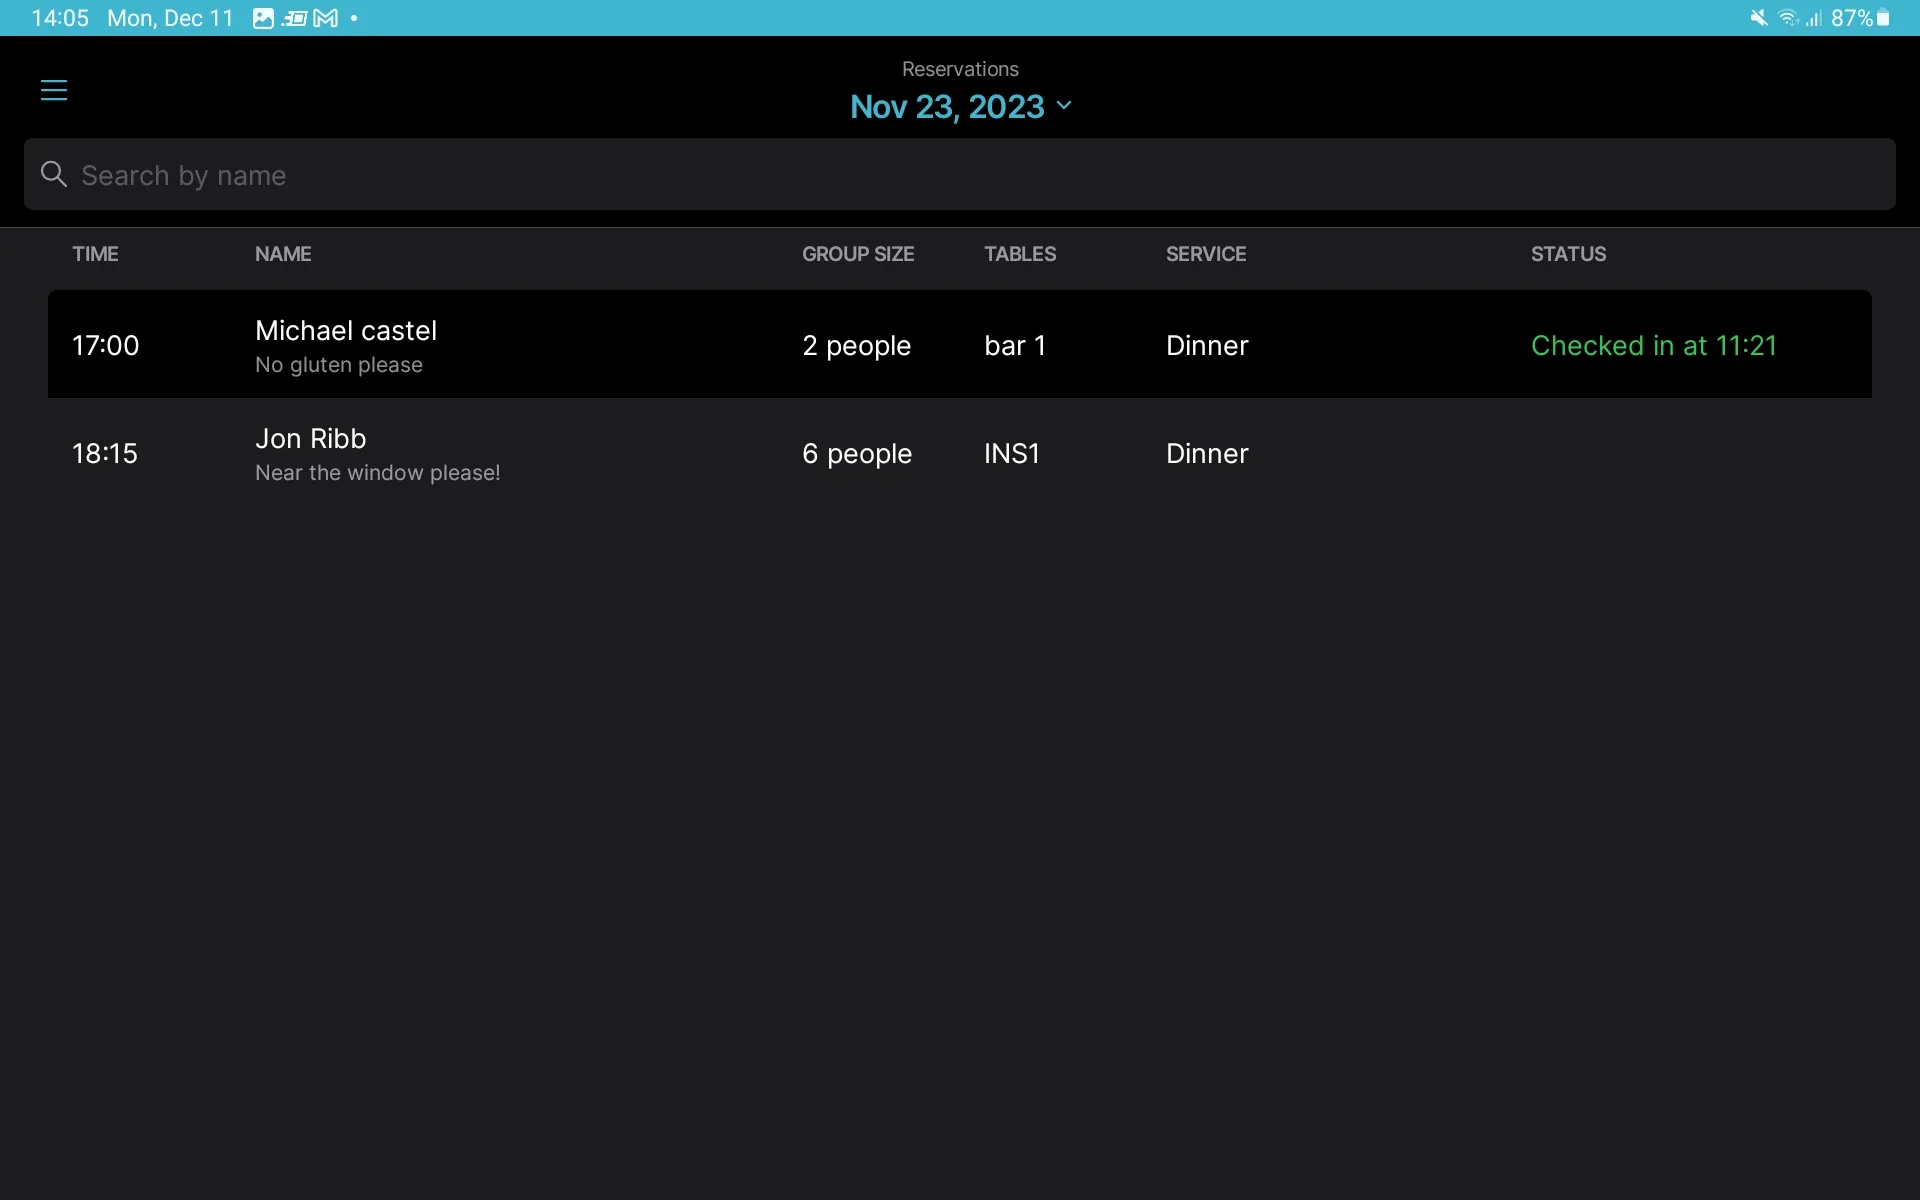
Viewing and checking in reservations via the Tebi App
- In the Tebi App, open the Menu (≡) and open Reservations.
- At the top, you can select the day you want to view. This is set to the current day by default.
- To check-in a reservation, select the reservation, and tap Check-in. When you do this, a sale will appear at the table the customer was assigned, (if using table seating) including the amount of their prepayment (if used).
- Reservation tables (and therefore capacity) are updated if you move a sale from one table to another.
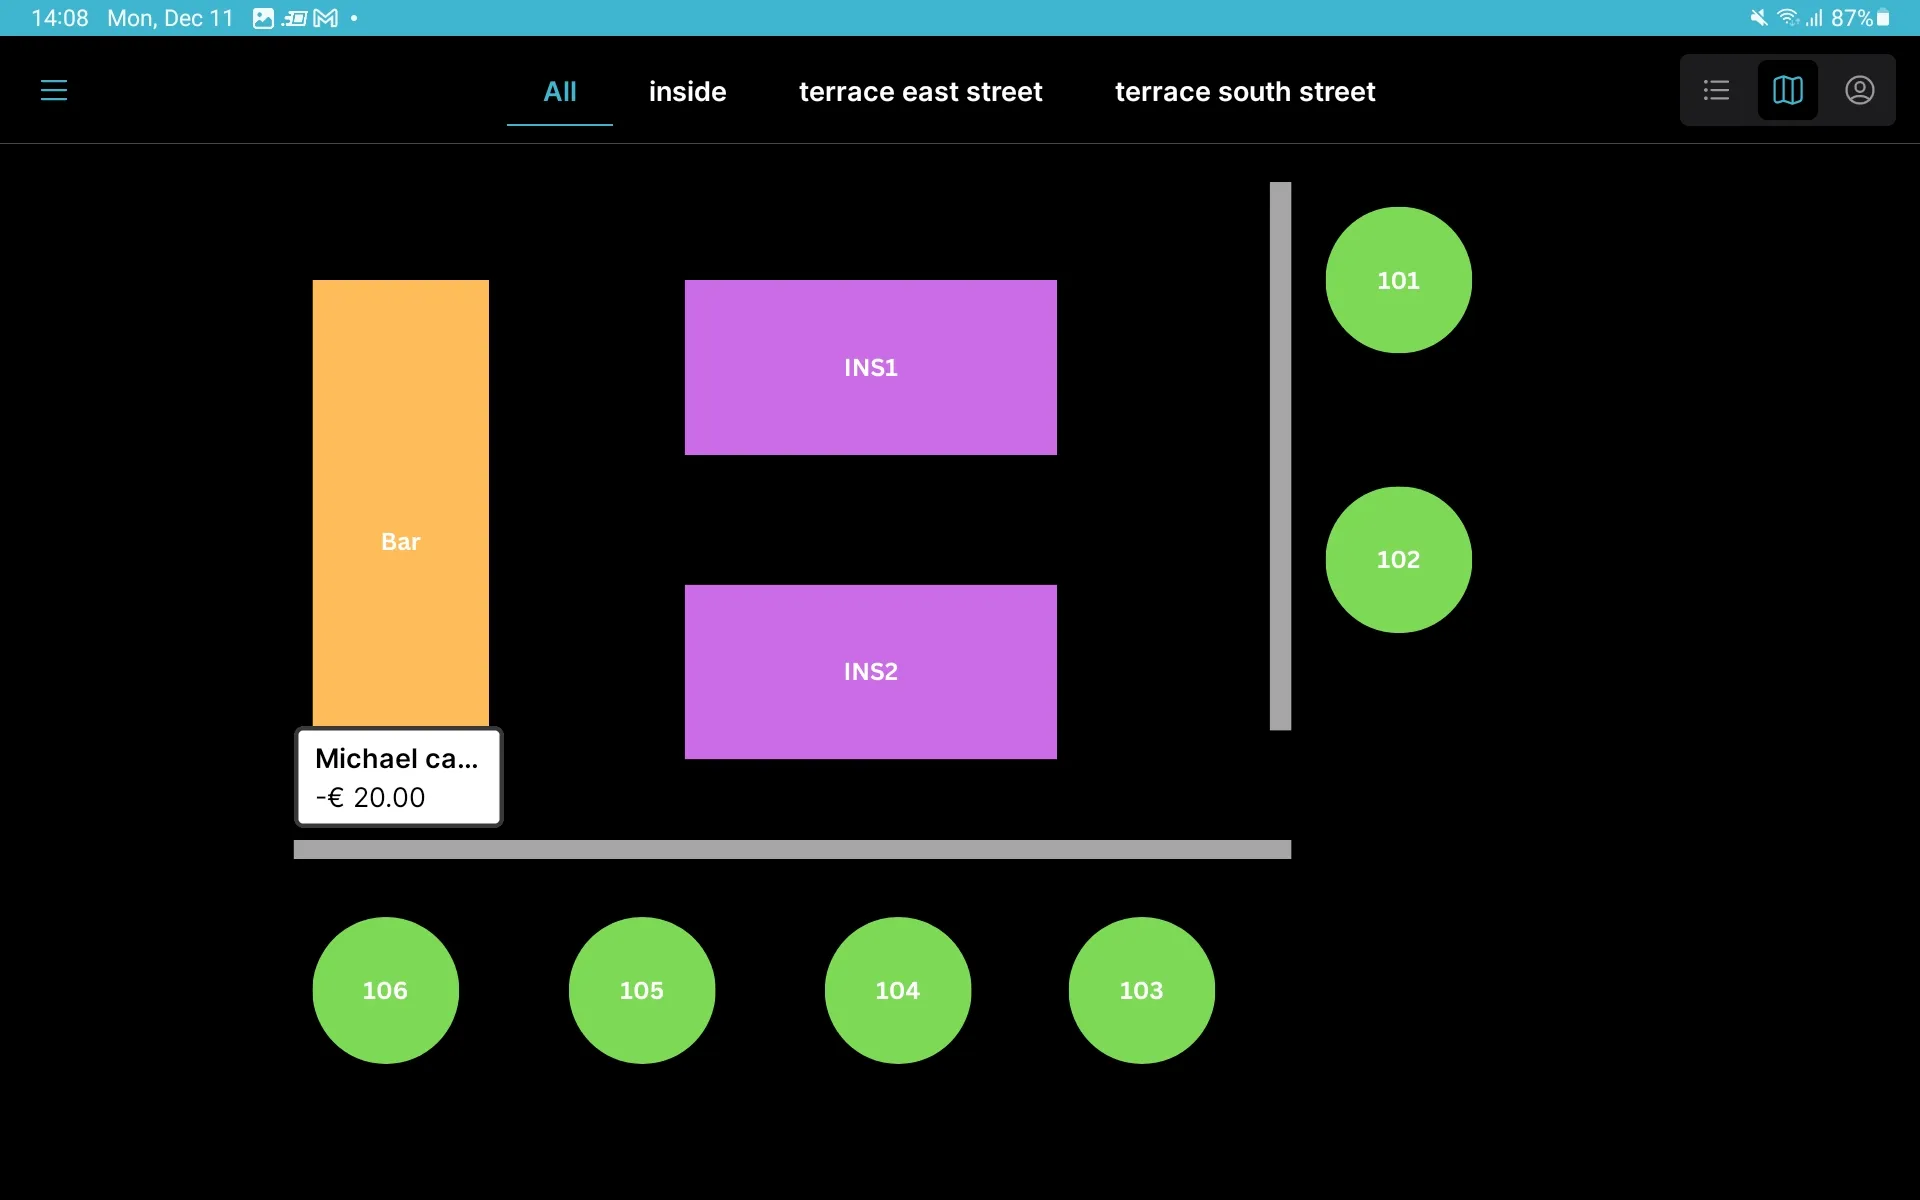
View reservations on the Sales Table Grid
- The Table Grid will show upcoming reservations.
- Use the Table Grid to check capacity during service. It will also show if the reservation extends across multiple tables.
To create a reservation from the Tebi App
- Open the app, go to the Menu (≡) and select Reservations.
- Press the plus icon (+).
- Select the service, group size, date and time, and click Continue.
- Then select an existing or add a new customer to create the reservation. If it’s a new customer, you can fill in more details if you want (such as, address, phone number, email, notes).
- Click Save and the reservation is finalized.
To edit an existing reservation in the Tebi App
- Open the app, go to the Menu (≡) and select Go to Reservations.
- Select the date of the reservation at the top of the screen.
- Open the reservation by clicking the name and adjust the details you want to change.
Walk-ins and availability
Customer walk-ins will be accounted for when determining availability, as soon as you open an invoice in Sales. The sale created in the Tebi App will block the related table from being reserved.
Messaging customers & internal notes
You can message customers that made a reservation or write internal notes that will be visible on the sale and prep station tickets.
- Go to the Tebi Back Office > Reservations.
- Open a reservation.
- Tap Add note / message.
- Write your note or message.
- Click Send to customer to send it to the guest directly.
- Click Private note for internal messages to the team.
Customers can also message you:
- They do this by selecting Send a Message in the email they received after making a reservation.
- You will receive an email to let you know they have contacted you.
- Click the link in the email you received or go to the reservation (in the Back Office > Reservations > Agenda or Timeline) to see their messages and reply directly via the message function in the Back Office.
Reviews
Collect reviews from your customers by emailing them the day after their reservation.
- Go to the Back Office, Reservations > Advanced.
- Turn on the toggle by Reviews to send an email to guests after their visit.
- To view them, go to Reservations > Reviews.
- On the Reviews page, you will be able to see the total number of reviews, the average rating, and the average number of reviews per month.
- To respond to a review, click View reservation / respond > Add note / message.
- Select Send to customer to message the guest directly.
- Select Private note for internal messages to the team.
- Click View receipt to see the details of the reservation.
External reviews
Request reviews from your guests on other websites.
- Go to the Back Office, Reservations > Advanced.
- Turn on the toggle Request external reviews.
- Fill in the Minimum rating guests should give before you ask them to leave an external review.
- Fill in the External review URL where guest can leave a review
Customer insights
Customer insights are available in the Tebi Back Office and the Tebi app.
In the app, go to the Menu > Reservations, and you find the insights by clicking on a reservation and it shows:
- Last visit
- Number of times visited
In the Back Office, go to Reservations > Agenda or Weekly, click a reservation and the insights show:
- Previous and upcoming reservations
- For previous reservations, the amount spent