Setting up reservations in the Back Office
Create a Floor Plan - Guest seating
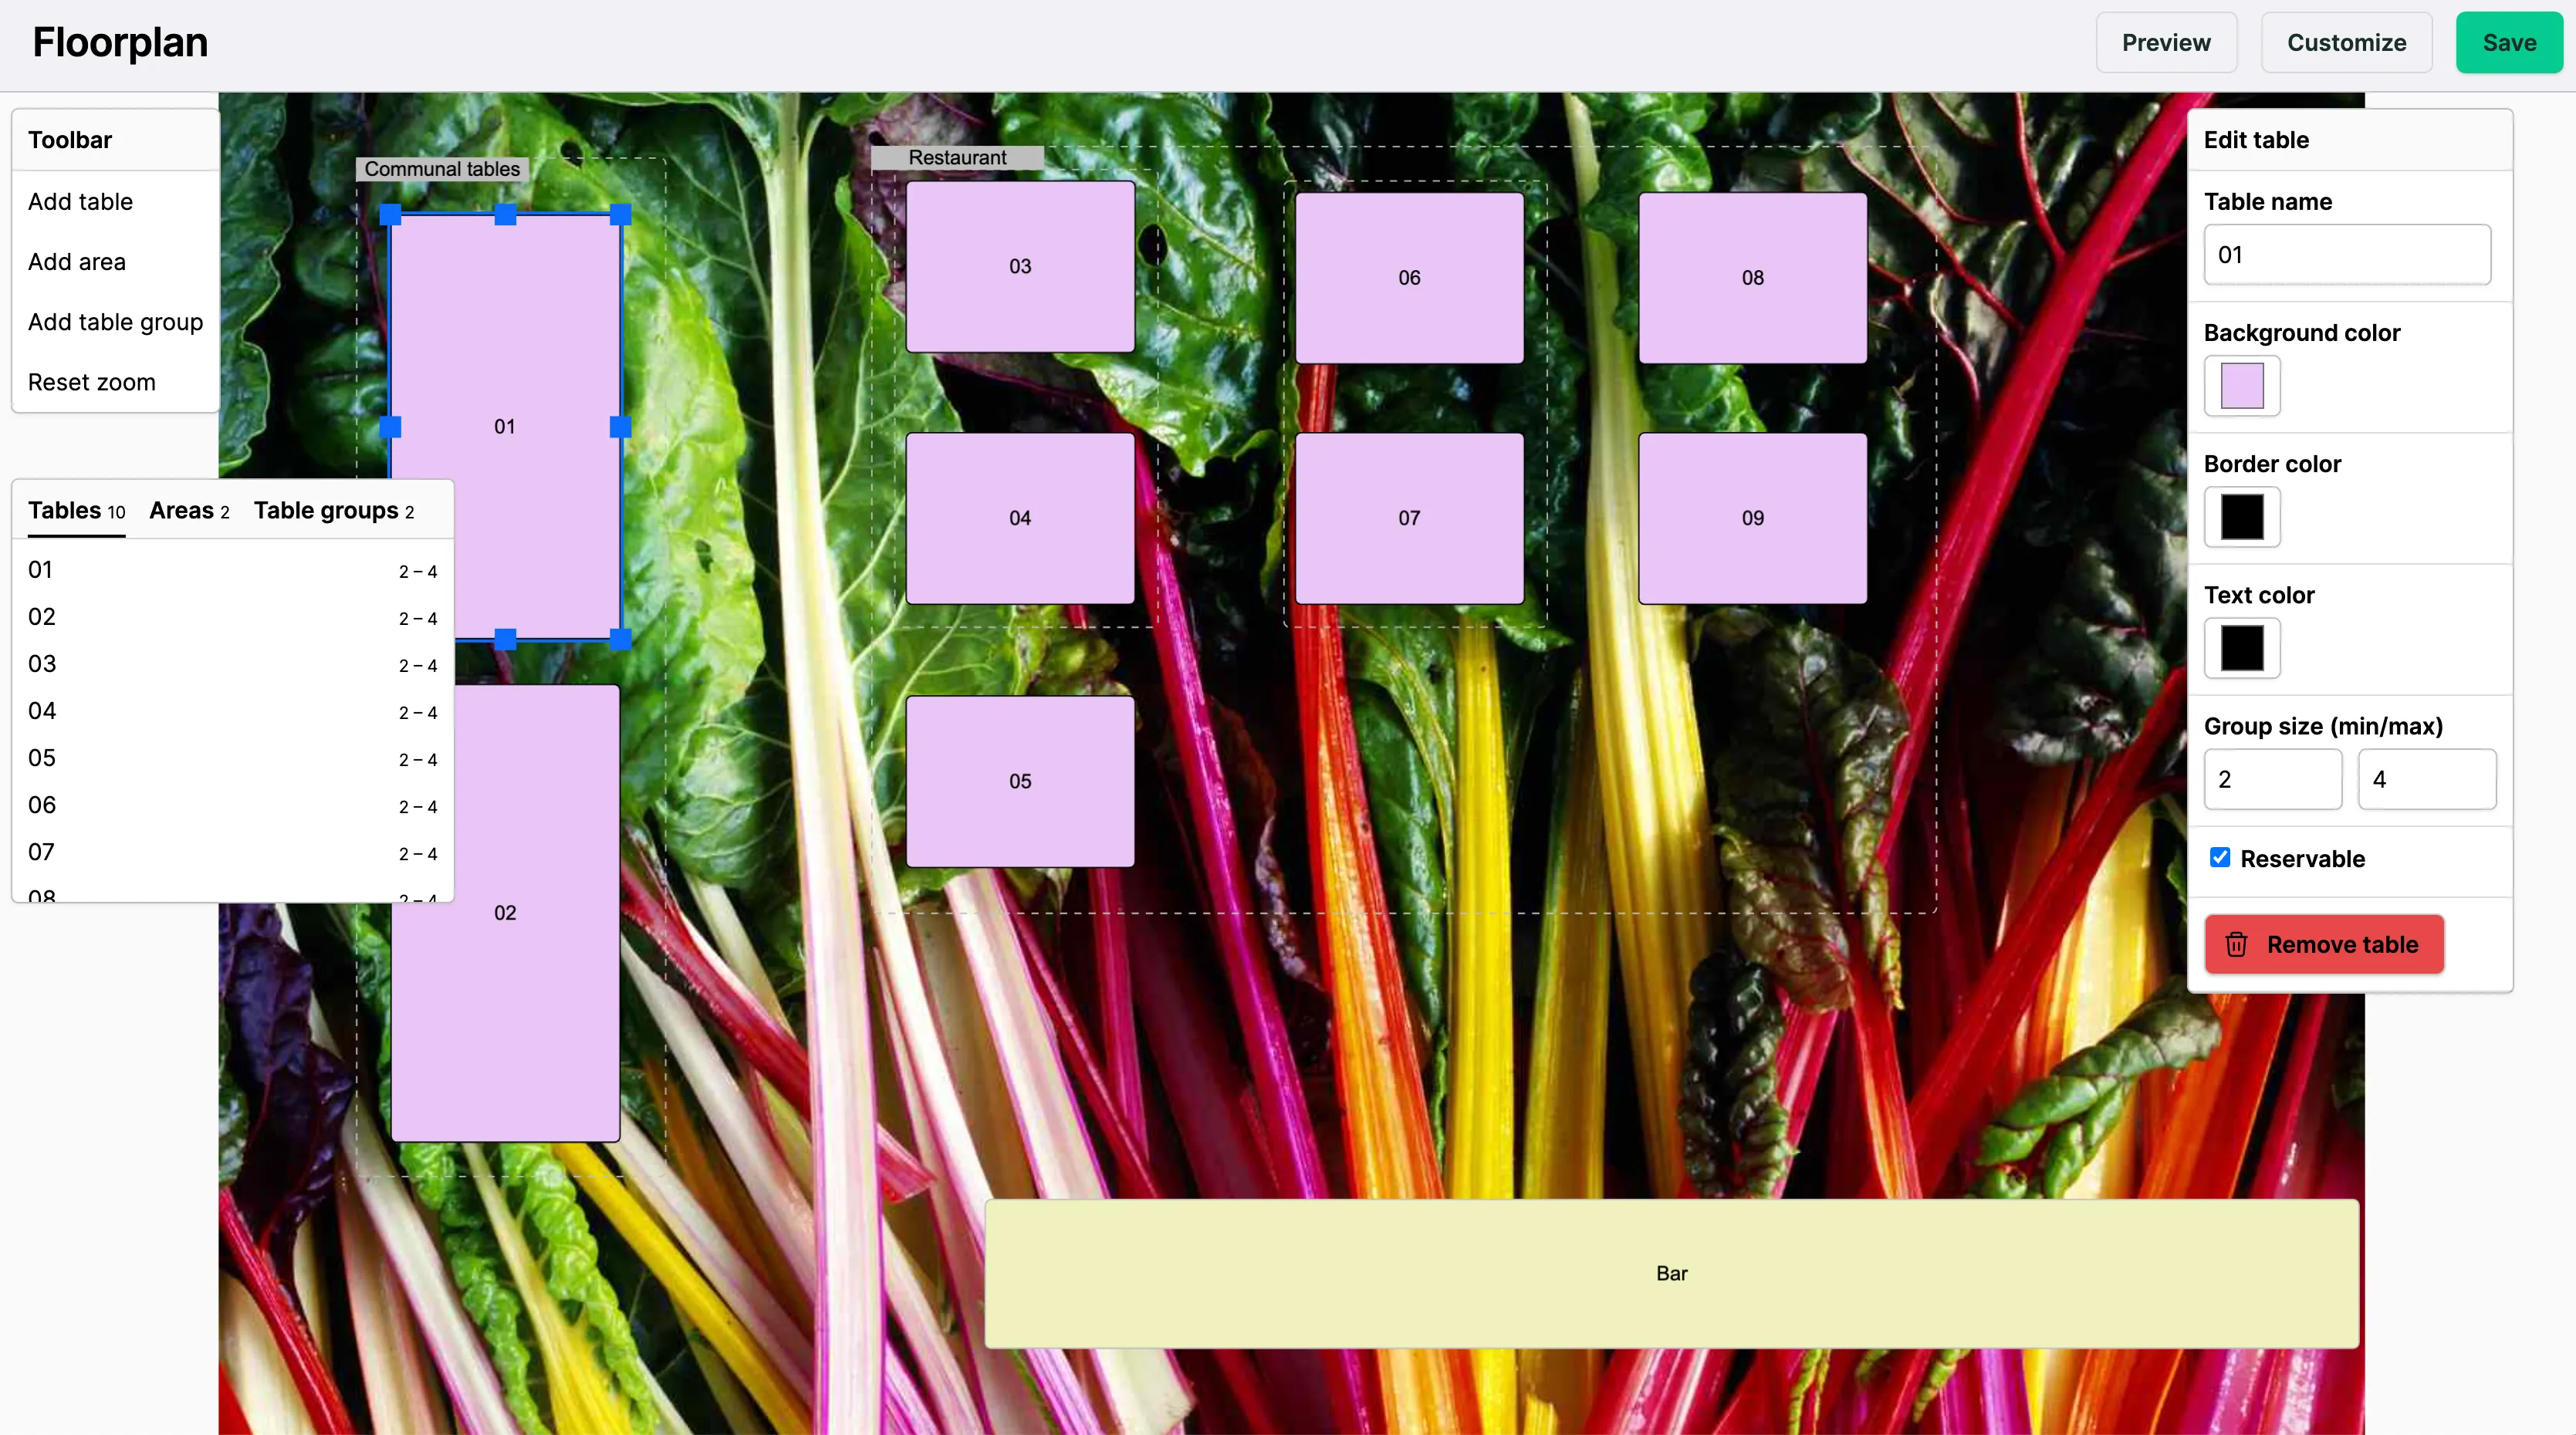
Create a floor plan, and use this to set up the minimum and maximum group size per table. In the floor plan you can start creating areas for specific seating, and create table groups.
- Go to Settings > Floor Plan
- For each table, select whether it is reservable, and set the minimum and maximum group for the table.
Note: While creating the tables keep in mind to give them another color then white, so you can easily spot the table that was ordered.
Set up Table Groups (optional)
Use this to create capacity for situations where you can combine tables together to cater for (larger) groups. Read here more detailed information on creating floor plan.
For example in the image below, the tables the tables 03 and 04 in the table group ‘03 + 04’ can be combined to cater to a larger group of 6 people. Note: This is a lower number of guests than when the tables are reserved separately. To solve this, read about the Capacity modifier below.
- Go to Settings > Floor Plan > and select Table Groups to view the table groups.
- Click Add table group and draw a box around the tables you want to combine.
- The Capacity modifier is used to change the amount of guests that can sit at this table group as a result of combining tables. If the capacity stays the same after combining the tables, leave ‘0’ in the modifier box. If you win 2 seats, enter ‘+2’, or if you lose 2 seats, then enter ‘-2’. The max group size will adjust automatically.
In the example below, when combining tables 03 and 04, you lose 2 seats (from 8 guests to 6) so the modifier box says -2.Use the Floor Plan to set up the minimum and maximum group size for each table in your business. - Go to Settings > Floor Plan.
- For each table, select whether it is reservable and set the minimum and maximum group size that can sit at the table.
Set up Services & Schedules for availability
Create a Service
Services are the experiences that a guest can book online. Think of a ‘Terrace Reservation’, ‘3-Course Lunch Menu’,’Pasta Workshop’, ‘High table reservation’, etc.
- Go in the back office to Reservations > Availability > Click the green button Create service
- Enter a name (w.g. ‘Lunch’ or ‘Snacks & Drinks’).
- Add an optional description and image for the service. These will be shown to customers in the reservation widget.
- Enable prepayments for the reservation
- Enter the prepayment amount
- Select whether the prepayment is charged per guest or reservation.
- Determine the cancellation window in which customers will be eligible to receive a refund if they cancel.
- Display of a Service
- To promote special services/events you can enable the ‘Highlight in widget’ toggle. This way the service is always shown in the widget.
- You can also hide the Service as a private Service. Disable the ‘Show in widget’
Note: highlighting a Service is not necessary for your regular Services, it promotes specific events and gives a boost for any ‘less’ popular Services you like to promote.
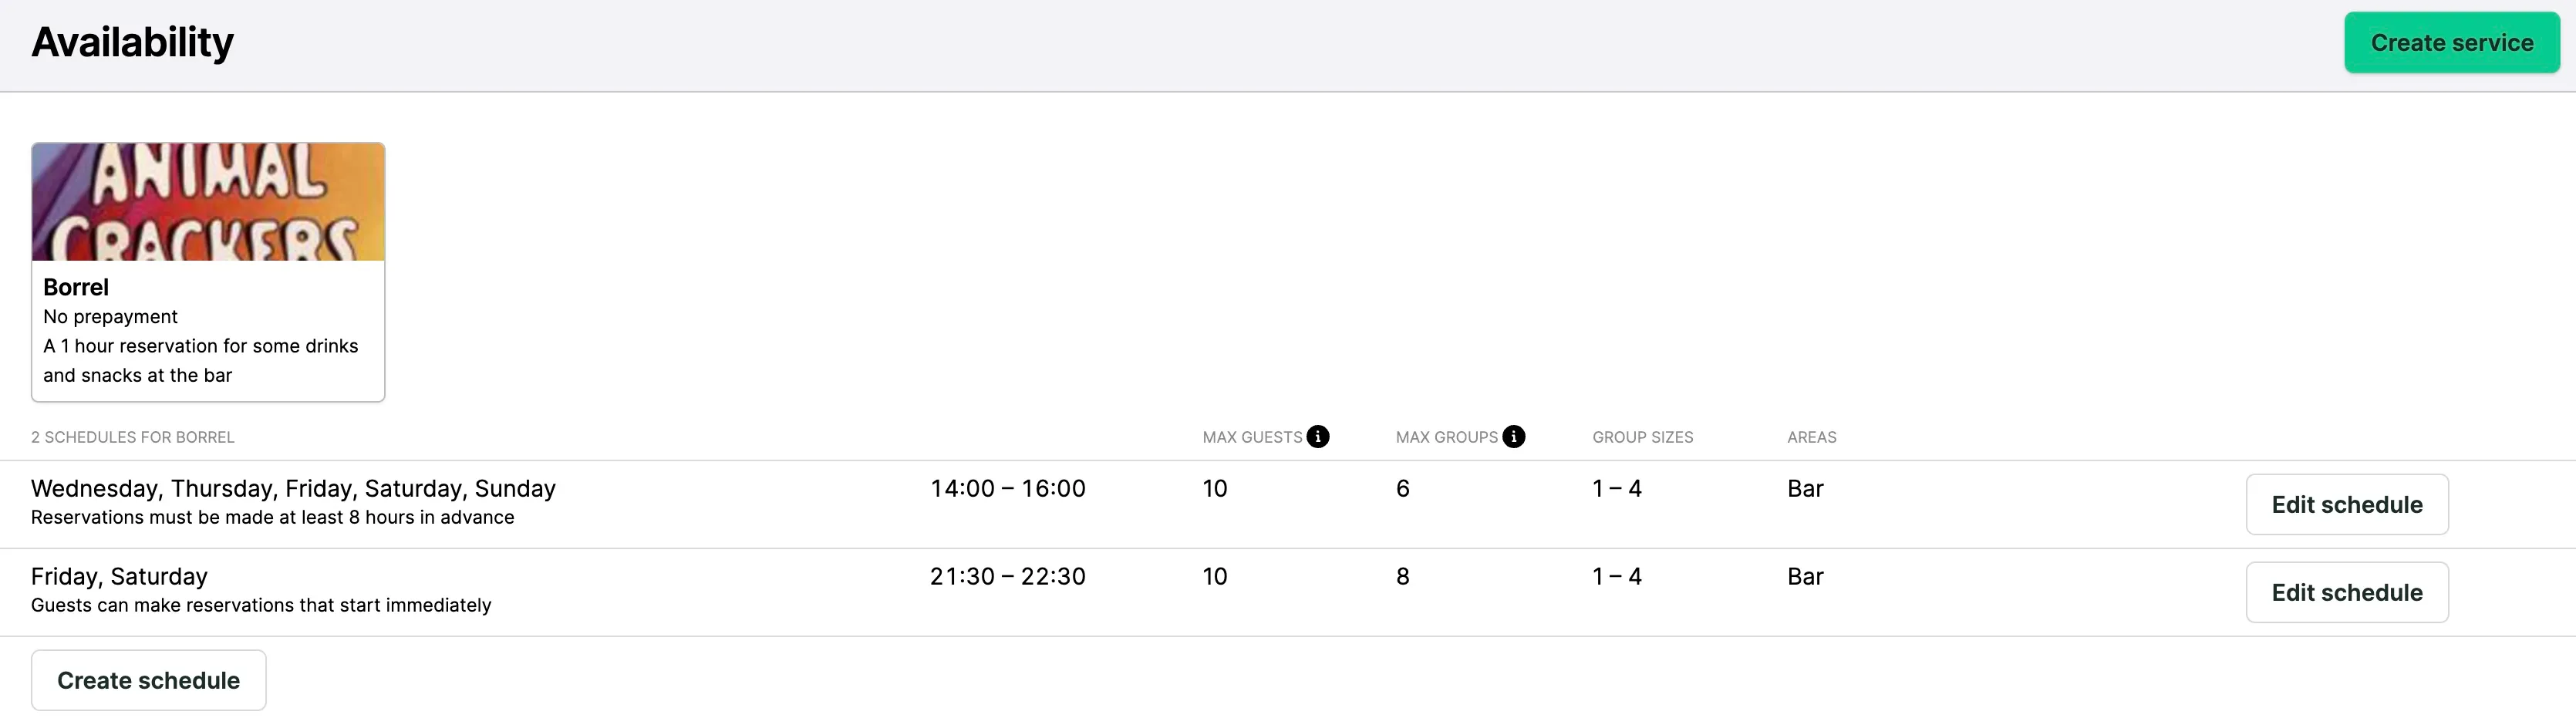
Create a Schedule
Availability is when a service is available for guests to make a reservation.
This is managed via availability schedules. Multiple schedules can be used for one or multiple services to determine when customers can reserve and to guide or limit capacity for the services involved.
- Go to Reservations > Availability > Click Create schedule underneath a Service.
- Select the services you want the availability schedule to apply to.
- Seating:
- Turn on the Allocate guests to tables toggle to automatically assign guests to tables. If you do not use this, table capacity determined in the Floor plan will not be used when calculating whether a customer can make reservations.
- Select seating areas for this schedule.
- Set the time, day, and date limits:
- Select if the days are Recurring weekly or only available at Fixed dates.
- Select at least one of the weekdays to which you want the availability schedule to apply.
- Select start and end times for reservations.
- Suspend availability can be used to open or close reservations between certain dates.
- Select the duration of the service. This is the average amount of time a guest has for the service before another reservation can be booked after.
- If you want your guests to see the end time, you can turn on the toggle ‘Display reservation end time’
- Squeezing allows customers to book shorter reservations when there is limited availability.
- For example, if the duration of a service is normally 2 hours, squeezing lets the customer book a service for 1 hour 30 minutes.
- If no regular service duration is available for the group size at the desired hour, the widget will show a squeezed reservation which a customer can book.
- Shorter, squeezed reservation end times are highlighted in the reservation widget, in confirmation emails and on check in.
- Booking window:
- Select how far in advance people can reserve.
- Select how long before service guests can make a reservation.
- Turn on the same-day reservation cutoff time. This stops new reservations from being booked on the same day after a specific time.
- Advanced guest limits:
- Maximum number of guests: by default, this is the sum of all seats in the area. Reduce the total number of guests who can reserve if you would like to save some capacity for walk-ins.
- Maximum number of groups: by default, this number is based on the sum of all reservable tables. It is possible to reduce the total number of groups. This number overrides the number of groups filled in under Pacing > Default pacing limits (see section below).
- Minimum and maximum group size: select the maximum and minimum number of guests who can reserve in a group. This is useful if you want to limit large groups from making reservations.
Pacing
With pacing you spread out your arrival flow of guests and reservations. Although you might have an available table in the Agenda at a time slot, you would like to spread the pace to control your workflow and offer a great service.
To reduce workload you can create a default limit per time slot. In Tebi you can set up the time slot interval via Reservations > Advanced > Gaps & Timing. By default a time slot is set to 15 minutes.

Set up pacing limits per weekday:
- Use the Adjust pacing if you want to change the pacing frequency for a particular time of the day.

Note: if you do not select a time slot in the weekday sections, the system automatically looks at the available tables, and limits that you have set up within a ‘Schedule’.
Day Limits
You can also change the limits per day if they need to be adjusted for any reason. This overrides the general availability and pacing limits.
- Go to Reservations > Agenda
- Go to the Day View > click on the filter icon on the top right
- To stop taking reservations for this date, turn on the Closed toggle.
- This will not affect existing reservations
- Adjust the maximum number of guests, at the same time for this day. This number applies to all time slots
- The default is taken from the availability and pacing limits.
- Adjust the pacing limits by selecting the max number of guests per time slot.
- Click Save

Reviews
You can manage your Tebi Reviews in the back office, reply, and request the guests to post a review online.
- Internal reviews: The review request Turn the toggle on to send an email to guests after their visit to leave an internal review.
- External reviews: Turn on the toggle to request a guest to write a review online on your Google Review page, for example.
Appearance
In this section you can customize the set up of the widget details, and add custom text to the confirmation email.
You can pick a color for the widget, the changes affect the widget directly when you press ‘Save’.
For the confirmation email you can fill in more details, and include a Google Maps link for direction. You can also enable the toggle for additional info in the confirmation email.
If you offer a max. of guests that can book online, you can include a larger group message. This is shown as a button ‘More’ > when you click on this option the widget guide you through the ‘Larger Group message’.

By default the widget shows a button for reservations ‘Reserve a table’. You can change the button into a custom text.

In Tebi you can activate a website pop-up if you have implemented the widget on your website. You can activate the website pop-up by enabling the toggle for promotions, and any other communication. You can start typing any text, insert HTML, and insert a call-to-action button for direct bookings in the widget or of a Tebi Service.
Location selectionYou fill in all the details there if you work with a multi location widget, and include an images.
Advanced
**Gaps & Timing
**In this section you decide what time slots you would like to show in your booking time frame, and you can offer gaps between reservations, to create time to clean and setup the table for a next reservation.
Note: my default the gap and time slot is set up to 15 minutes.
Enable the toggle ‘Change start time when checking in’ if you would like to reservation the open on the real time line if you check it in. If a guest is late, the reservation might overlap on the next reservation on the same table. This does not affect the upcoming reservation, it only shows you a conflict warning.
**Redirect users after booking their reservation
**You can use this to fill in a url that you would like to guide your guests after making a reservation. This is for analytics purposes.
**Waitlist
**In Tebi you can activate a waitlist. The waitlist will be enabled for all your online availability in the widget. Once a timeslot is fully booked, or fully booked by limit settings, the waitlist is automatically shown in those timeslots. Guests can join the waitlist for a specific time slot and Service.
Enable ‘Automatically invite guests from the waitlist’ if you want the guests that joined the waitlist, to receive an email notification when a spot comes free. The guests have to claim the spot as fast as possible. First comes, first service. If you keep this toggle disabled, you manage the waitlist manually.
Note: if a spot opens up, guests that visit your website and the widget, can also book the spot.
**Stand-alone reservation options
**You enable these toggles if you only actively work with Tebi Reservations.
Widget
Here you find all the details to implement the widget. This includes reservations, and also the widget when you’ve activated the QR takeaway shop, and the gift card shop.
Read more about how to install the widget in this article.