Using a digital prep station
Using digital prep tickets
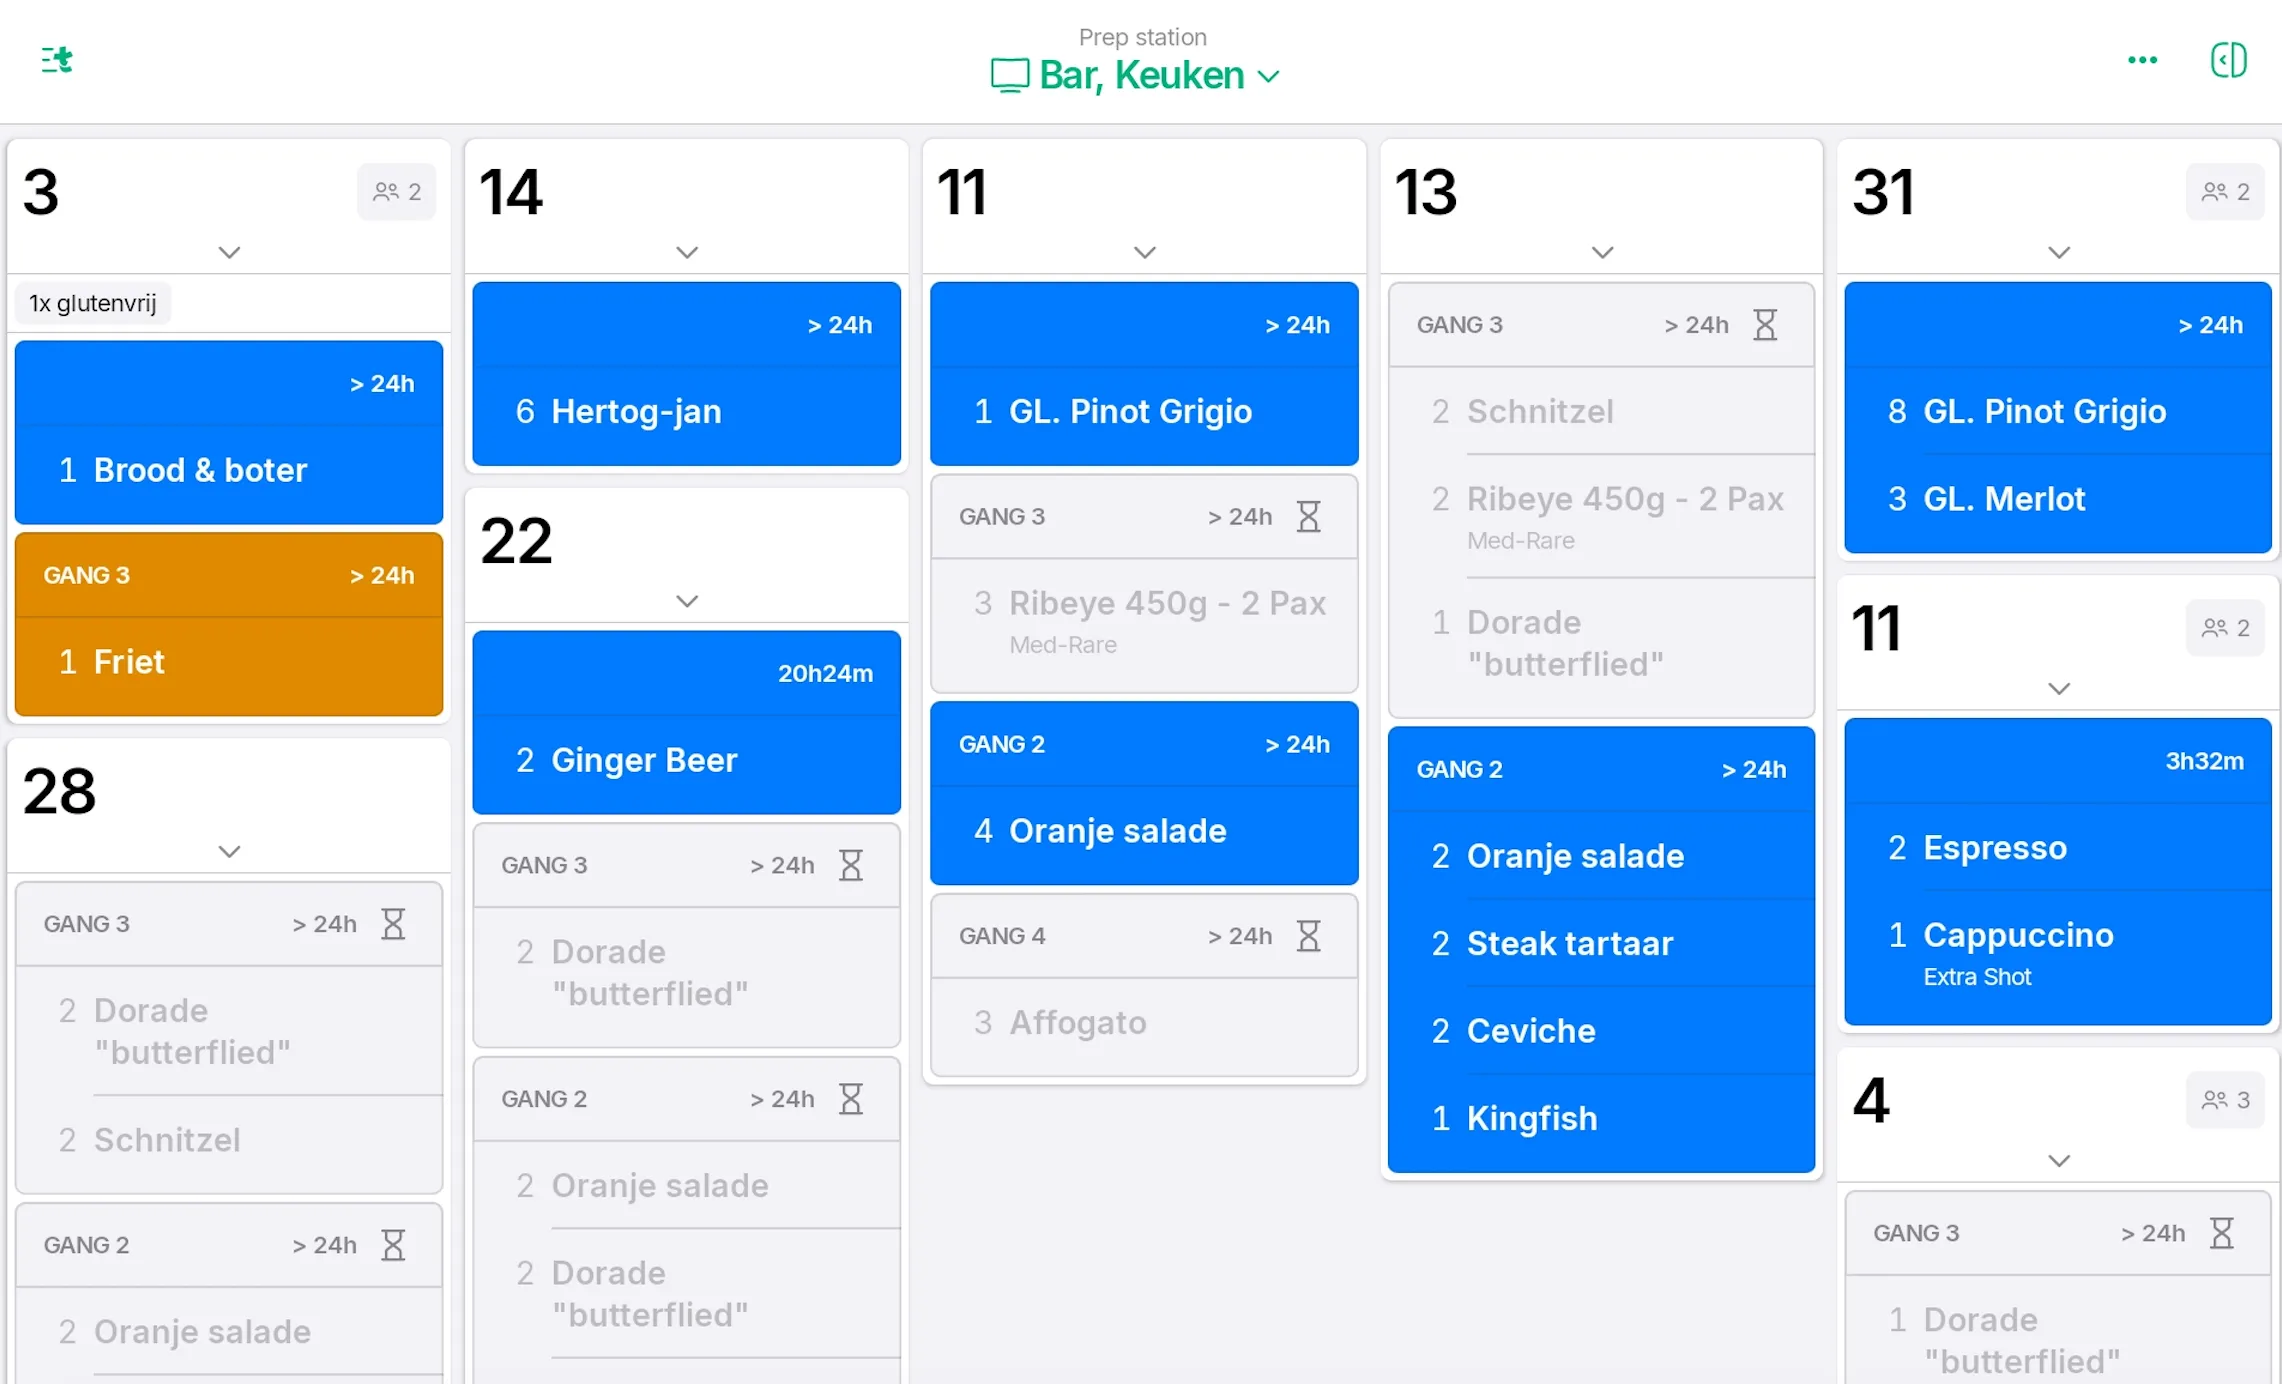
Prep tickets are created whenever products which are assigned to the Prep Station are submitted in a Sale. Tickets are updated when products are added, removed, or edited in a Sale, and when customer and sale details change.
Kitchen workflows
There are two Kitchen workflows: Quick mode and Kitchen mode. The workflow is device specific. The default mode on your device is set to Quick mode.
-
Quick mode allows you to quickly close a ticket and mark off products with a single tap. So products in the same order and/or courses can be in different status (e.g. ordered, preparing, ready to serve or completed).
This mode is best for quick service, coffee shops and bars.
-
Kitchen mode limits accidental interactions with prep tickets by making it easier to change the status of a product (i.e. preparing, ready to serve, etc.). In this mode, products in the same order and/or course can only be moved to the status in one go, not on an individual basis.
This mode is best for kitchens that works with coursing.
How to switch between Quick or Kitchen mode:
- Go to in the App > Menu > Prep station;
- Click on the three dots > Settings in the top right corner;
- Click on Advanced and switch between modes by using the toggle next to Enable quick mode.
Quick glossary
- Preparation status: on hold (related to course firing), ordered (blue), preparing (orange), ready to serve (green) and completed (striped through). These can be set up per prep station, in the Back Office under Settings > Prep station.
- Note: colors noted here are the default ones, you can change these in the Tebi App: Settings > Prep stations > click on the prep station and go to the preparation steps to change the colors.
- Courses: the courses you have set up on the Prep station page.
- Course firing: also on the Prep station page, this setting determines how the courses are firing in the kitchen by the FOH.
- Priority of statuses: in the queue of your prep tickets, the order of priority (so which tickets are at the front of the queue) is based on a specific hierarchy: if a course is set to ready to serve, it is in front of preparing. If a course is set to preparing, it is in front of ordered. However, when a course is set to completed, the ticket goes back to the end of the queue.
Quick mode
- Changing the preparation status of all products in an order/course and move the prep ticket between statuses by tapping the course header and selecting the status you want to move all the products in this order/course to.
- To move an individual product to the next status, tap the product in the prep ticket. If there is more than one product in a course or ticket, the status of the ticket will update based on the product with the later preparation status (e.g. status preparing is later than status ordered, so the ticket moves to the front of the queue).
- Tickets will group together by status. For example: if you have three coffees across 3 different tickets, and move these to the status preparing, it will move the 3 tickets to the front of the queue.
- To close a whole ticket, tap on the ticket header and click on the green check mark.
Kitchen mode
- To change the status of a course, tap on the course header and select the desired status.
- Individual products in the same order/course cannot be moved to a different status: all products in the same order/course have to be moved in one-go.
- Tickets will group together by course status. For example: 3 tickets all with the main course set to preparing status will be grouped together allowing you to focus.
- To close a ticket, tap on the green-check mark in the ticket header, this check mark appears when all courses are set to the status completed.
Shared features:
- Grouping tickets by Preparation status, with the option to toggle this off
- Preparation steps are: on hold (related to course firing) ordered, preparing, ready to serve, and completed.
- To select the preparation steps go to Settings > Prep stations > click on the Prep station > scroll down to Preparation steps
- Shows details (like staff member and order time) behind long presses of a prep ticket
- Select the color of a prep ticket course or product background:
- Go to Settings > Prep stations > click on the Prep station > scroll down to Preparation steps
- Select a color for each step
- When a course or product enter this step, the selected color will be applied to the background of the course or product
Digital prep station Settings
- In the Tebi App go to > Prep station
- Click on the three dots in the top right corner > tap Settings
Display
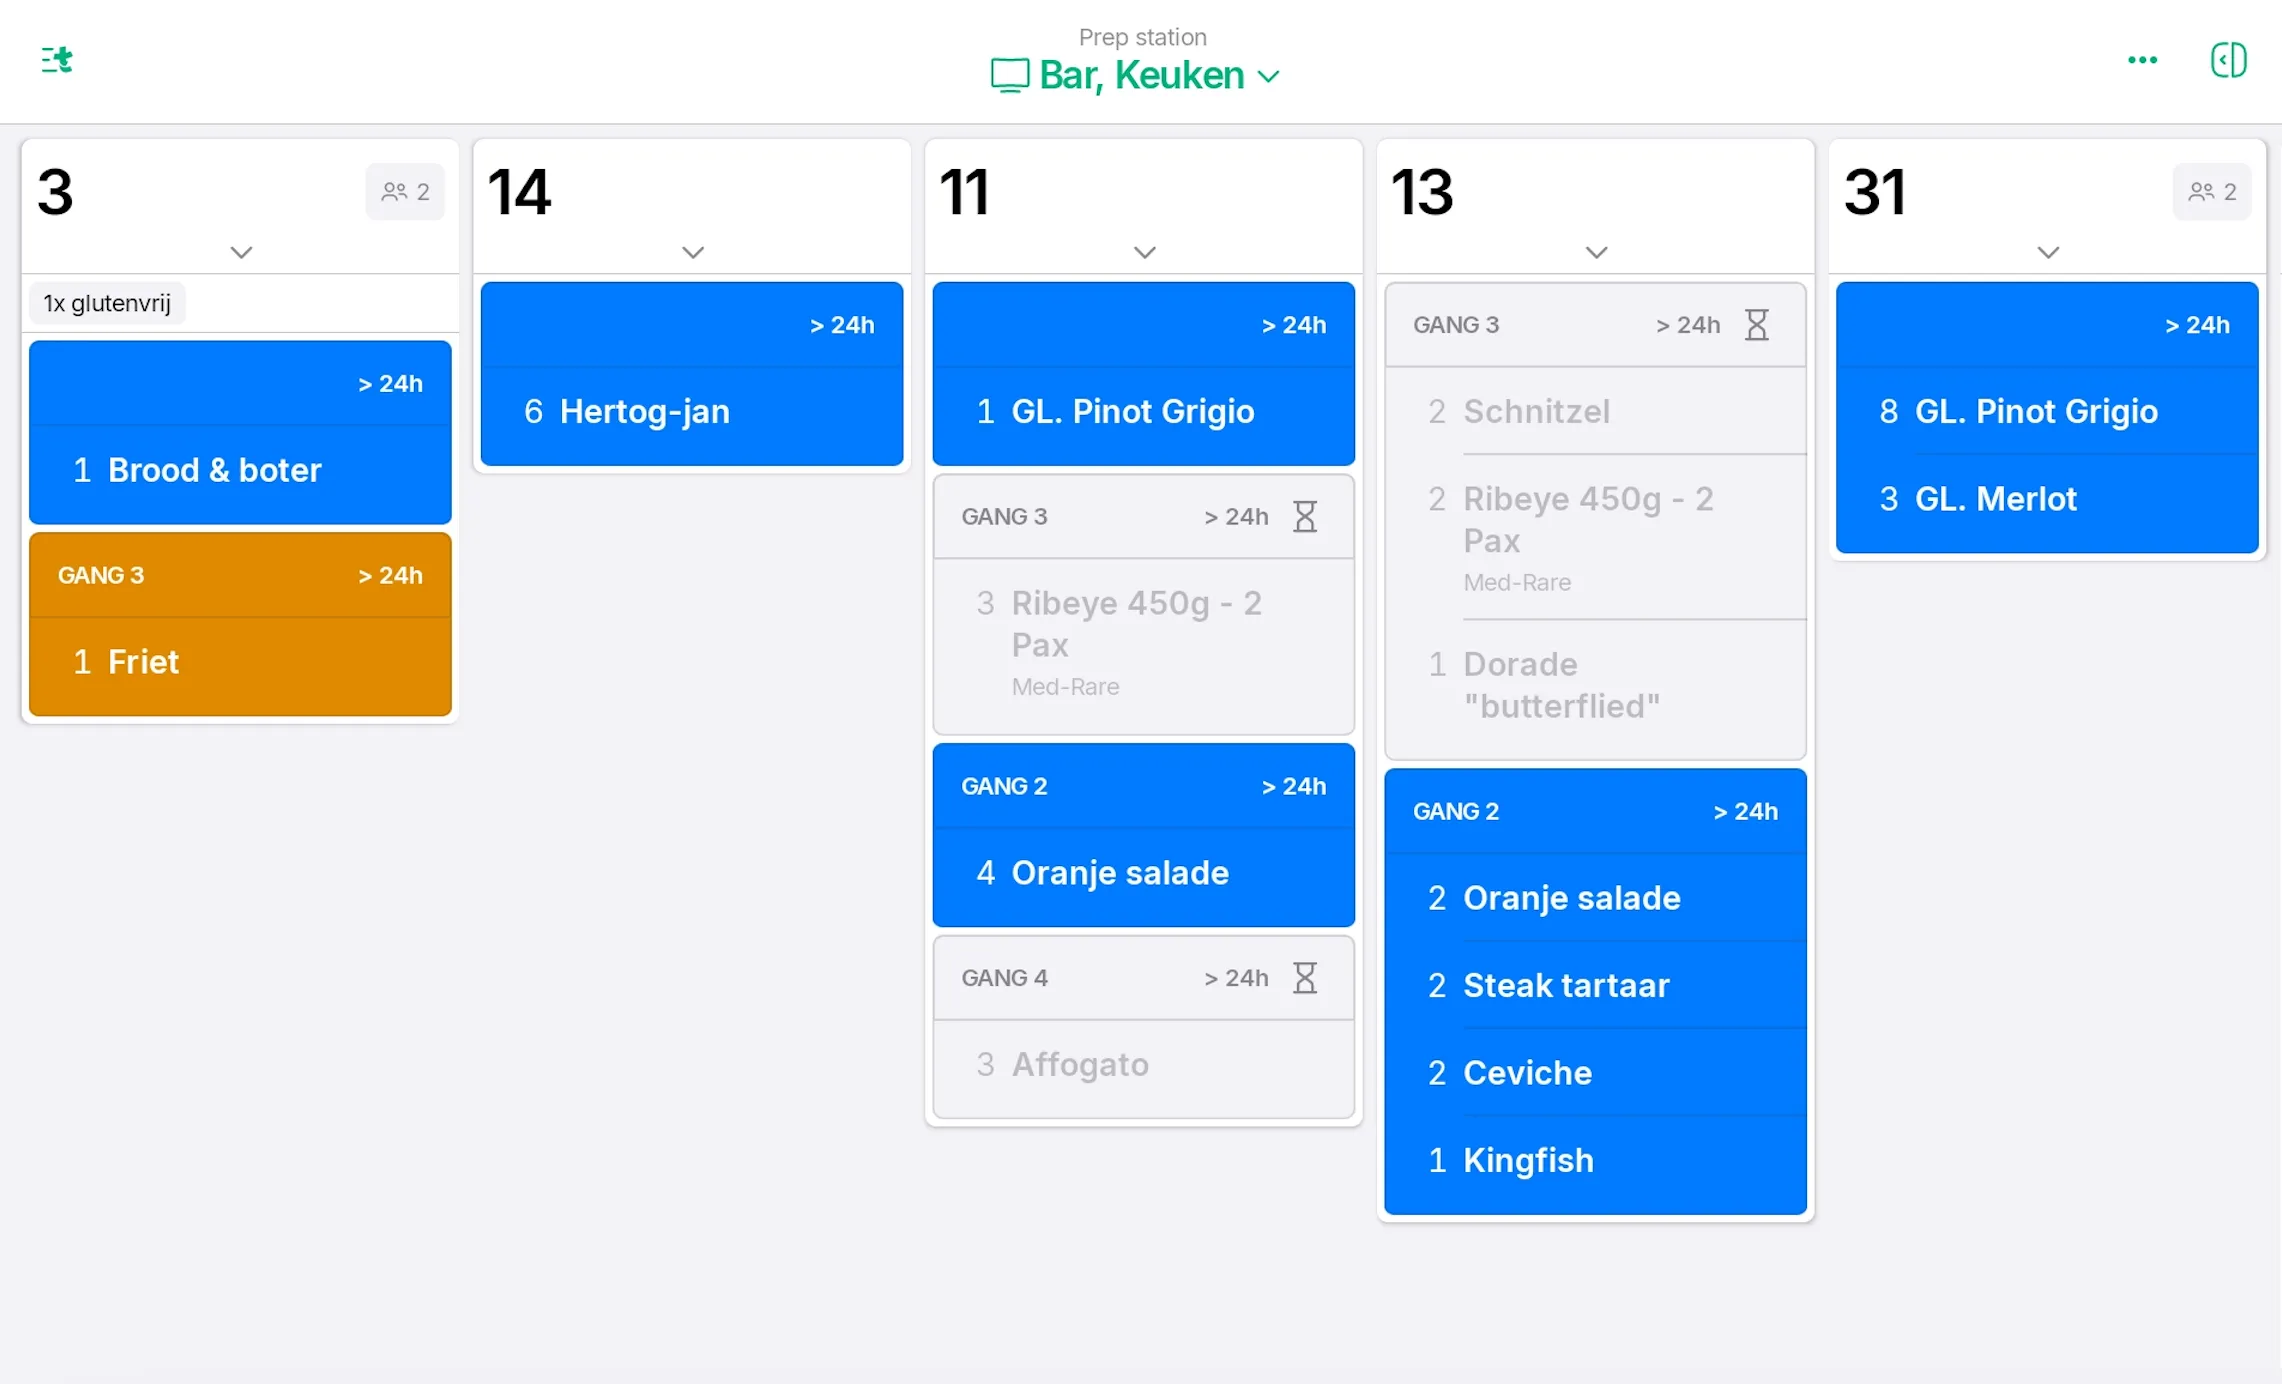
Click on View mode to select the layout for the prep station tickets.
- Rails - tickets are shown in a single row with horizontal scrolling.
- Set the number of Columns shown or turn on the Automatically set columns toggle.
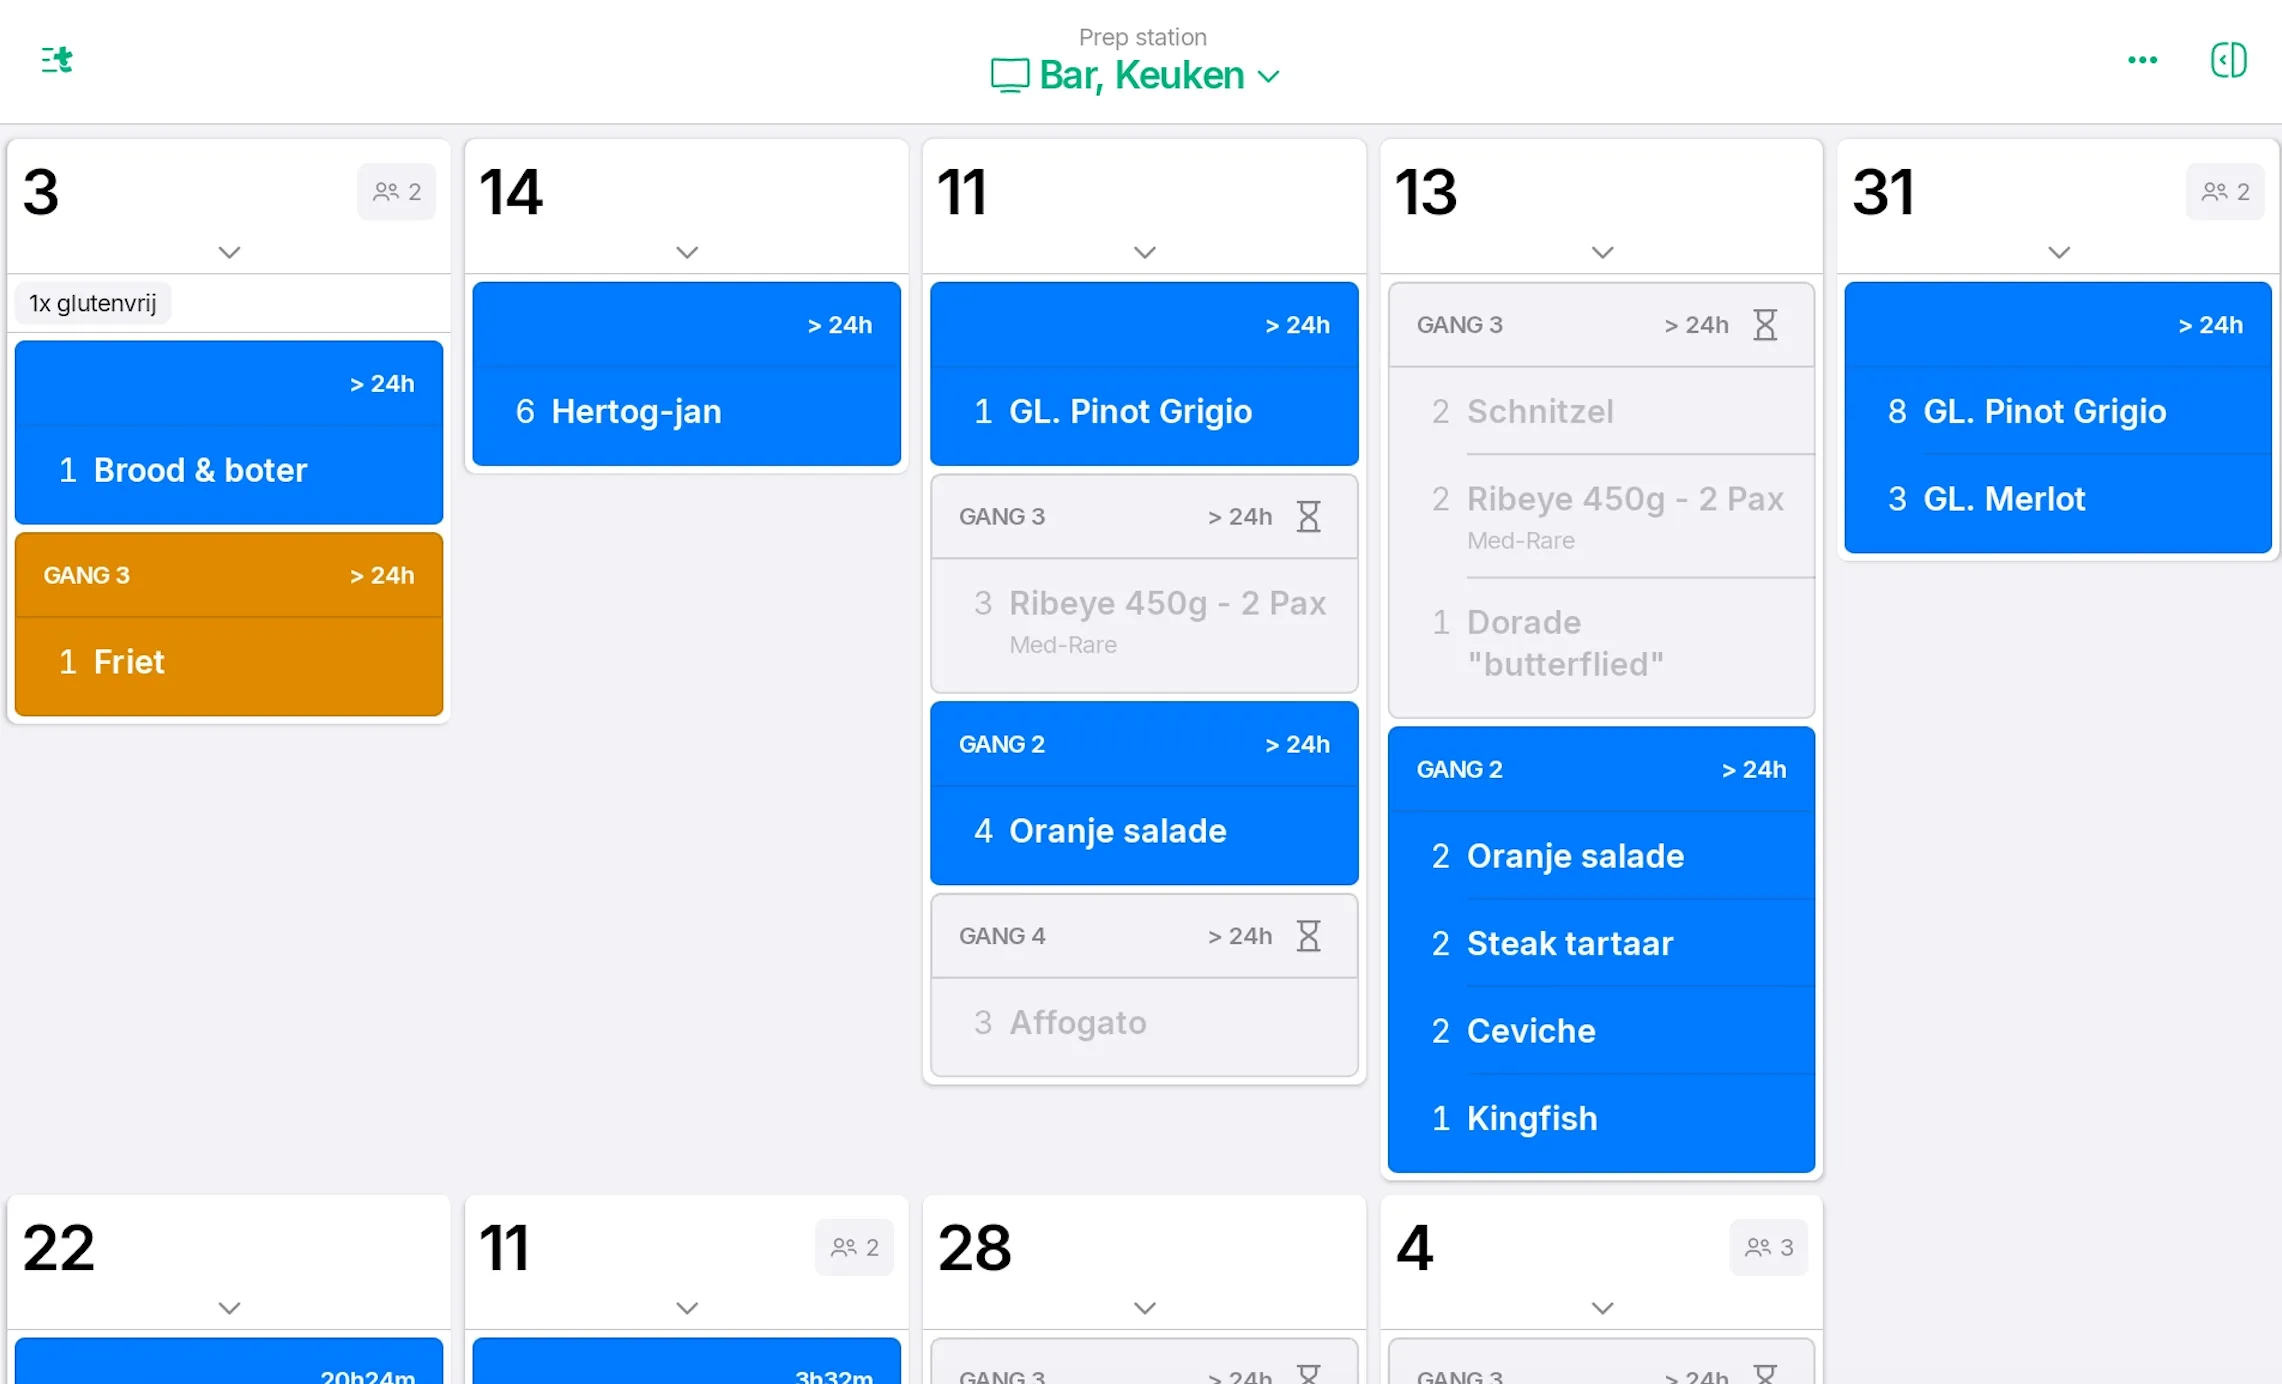
- Grid - tickets are shown with a fixed height with vertical scrolling.
- Set the number of Columns shown or turn on the Automatically set columns toggle.
- Set the number of rows shown.
- Gallery - tickets are displaying across multiple rows with vertical scrolling. The row heights is determined by ticket length.
- Set the number of Columns shown or turn on the Automatically set columns toggle.
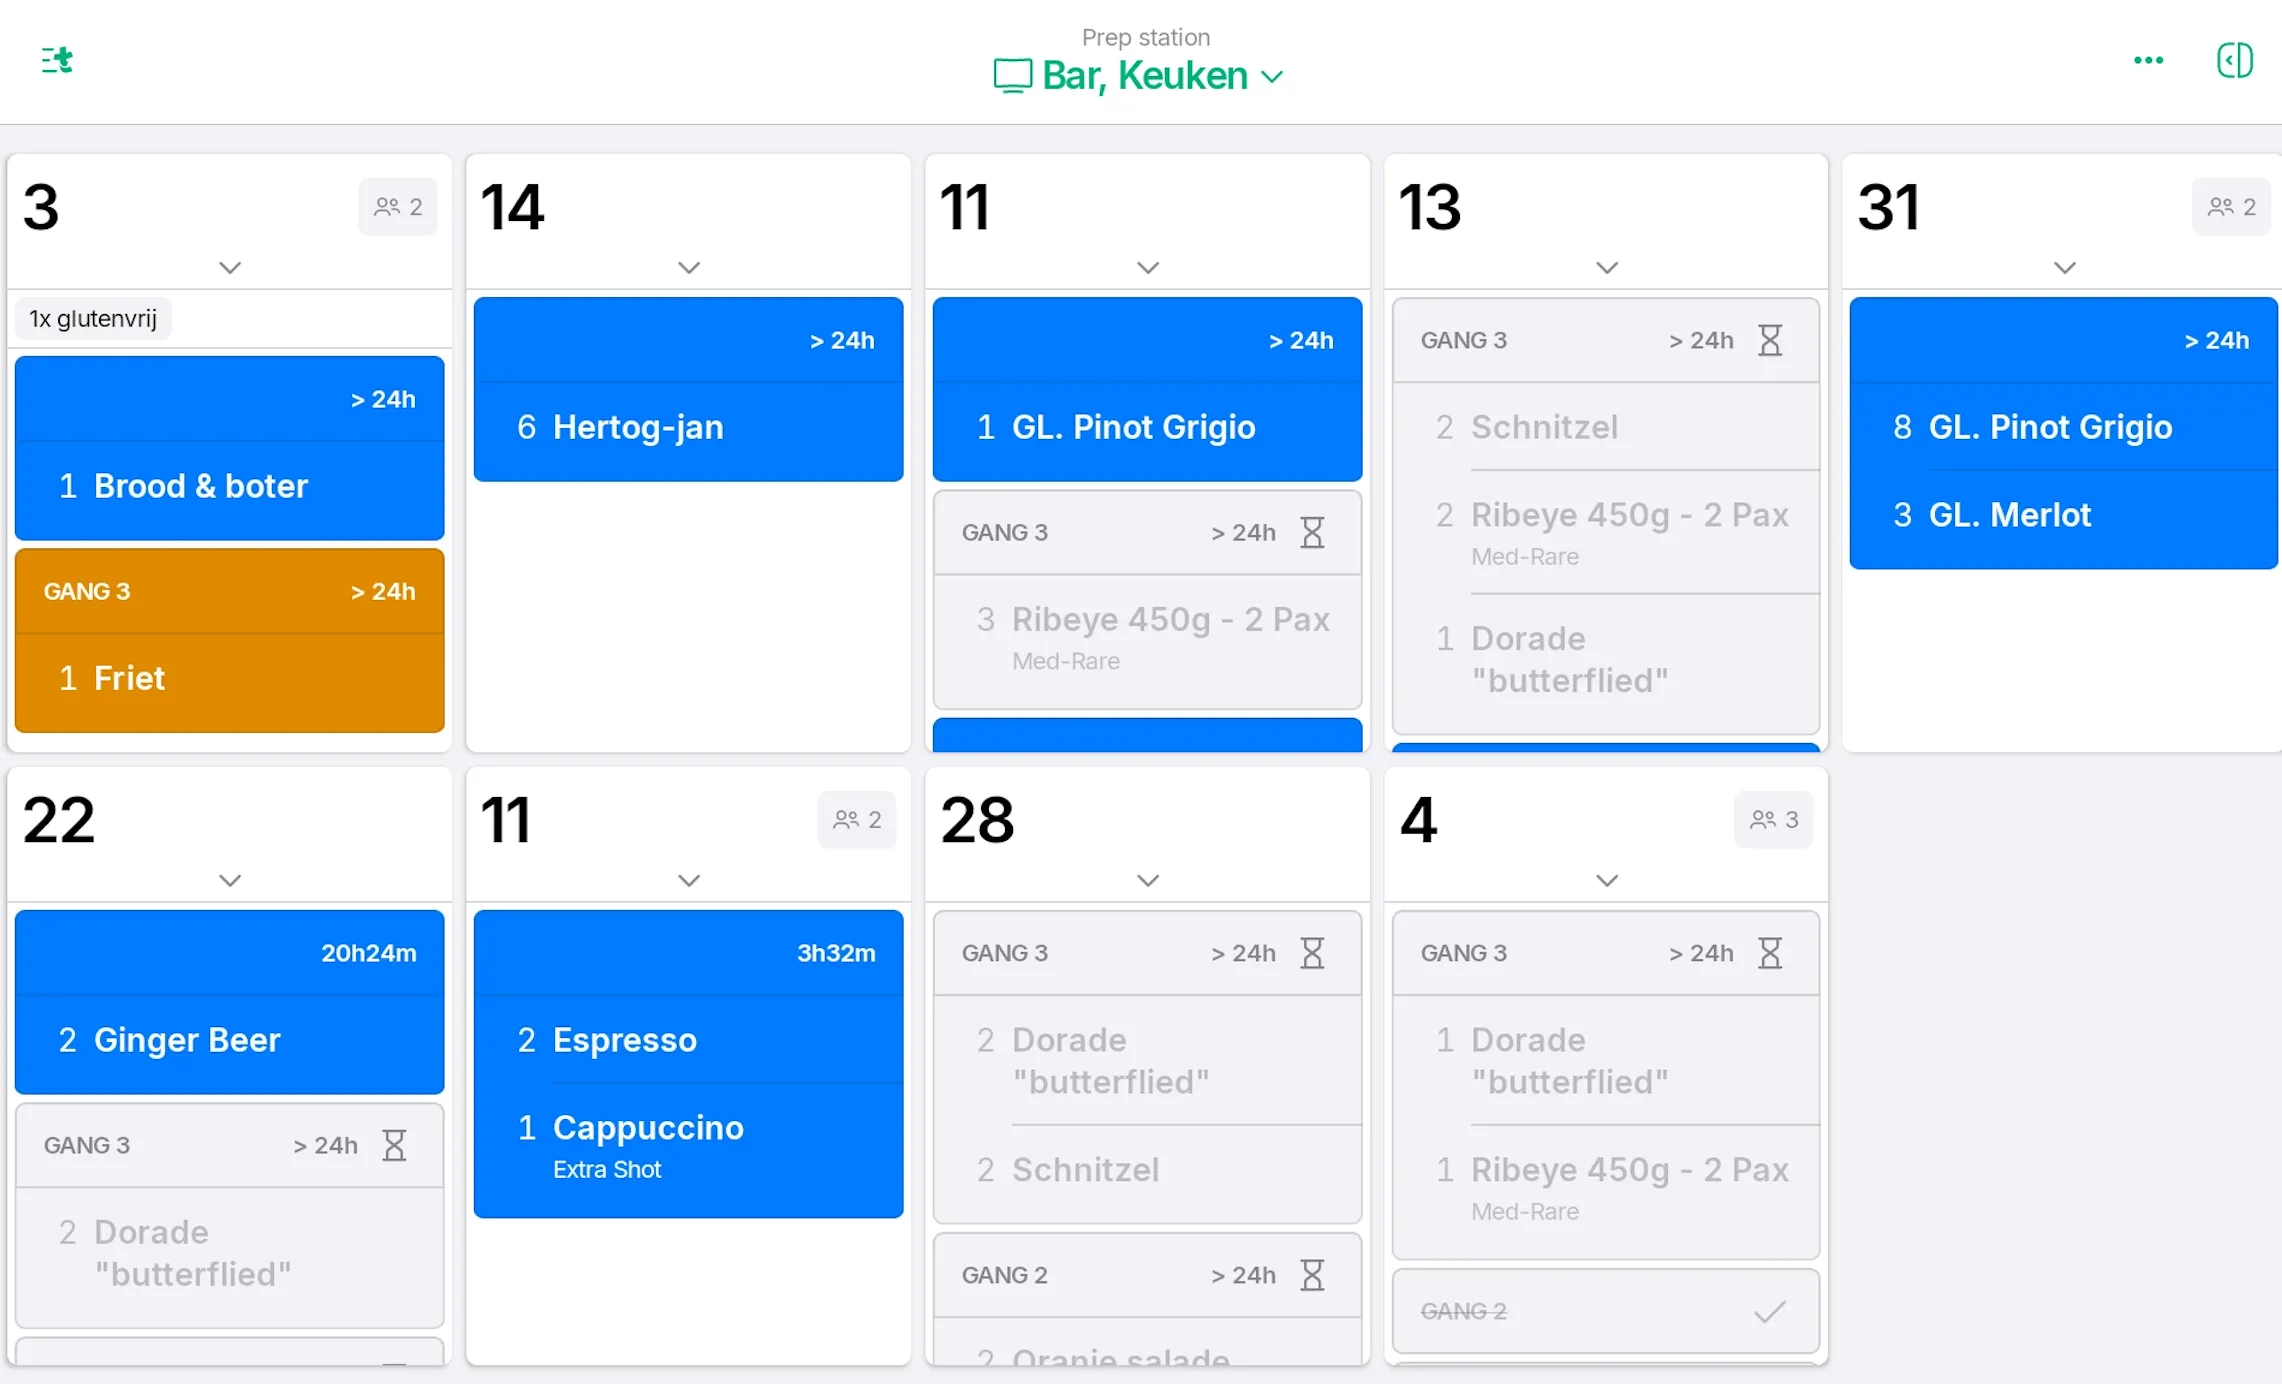
- Compact gallery - tickets are shows with variable heights and arranged to get the most full height tickets on the screen at once.
- Set the number of Columns shown or turn on the Automatically set columns toggle.
Header
- Click on Header info to change the important information shown at the top of a prep ticket, like:
- Ticket number
- Table
- Pickup time
- Sale name
- Adjust the Header text size to: Small / Medium / Large
Course timers
- Select what a ticket’s course timer displays. If you want the timer to update:
- When a course changes status choose: From last status change
- The time since a course was fired: From fire time
- The time since the order was placed: From order time
Statuses
Visible statuses
Choose which statuses appear on this prep station. Tickets in an unselected status are hidden from the list. At least one status must remain selected.
Allowed statuses
Choose which statuses staff on this prep station can move tickets to. Tickets can still be shown in other statuses (if visible), but those statuses are read-only and cannot be selected from this device.
Advanced
- Enable quick mode to quickly close a ticket by tapping on top of the ticket and mark off products with a single tap.
- Reorder tickets when status changes
- When enabled tickets automatically reorder when the status of the current course changes. Tickets with the same status are grouped together.
- Select how you would like to view unfired courses:
- Collapse all unfired courses
- Expand all unfired courses
- Expand the next unfired course only
- Animate ticket layout
Multiple prep stations - display
To select the Prep Station you want to display:
- Go to the Tebi App > Prep Station
- The name of the selected Prep Station will be visible at the top
- Click on the name to see a list of all the Prep Stations
- Select the Prep Stations you would like to view
- It is possible to select multiple Prep Stations at the same time
- This can be used to coordinate who is preparing what and seeing when a course is fully ready at the pass
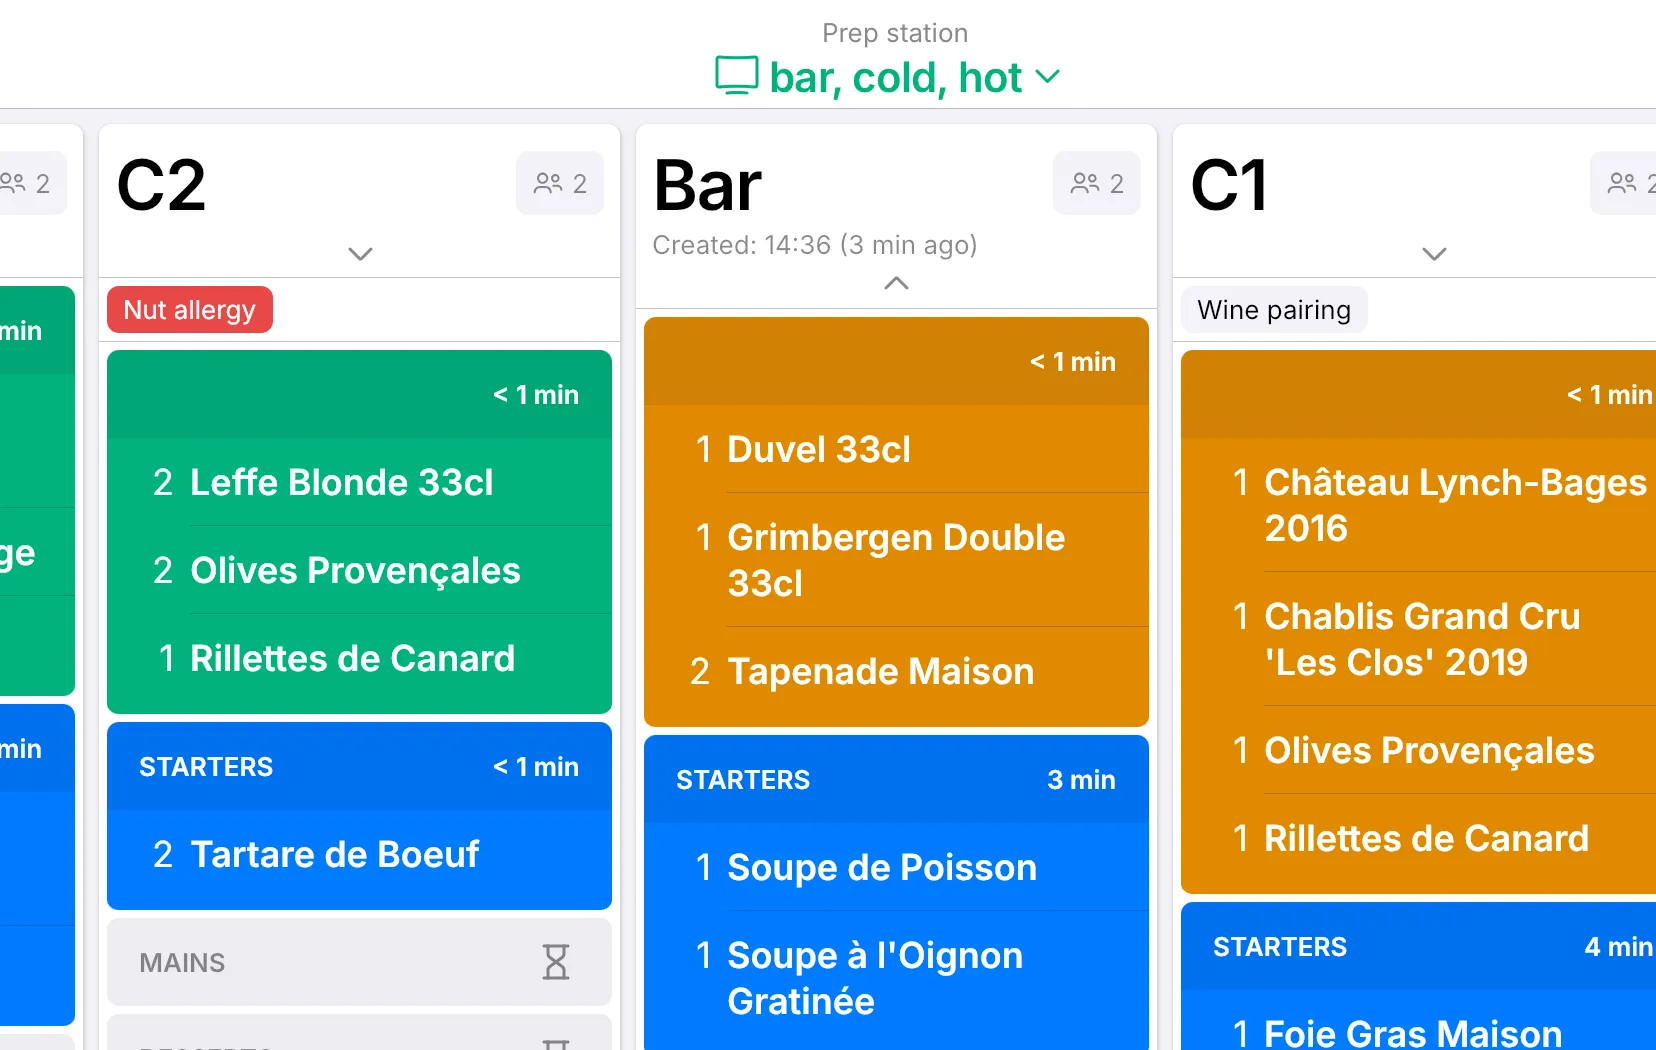
Viewing Multiple Prep Stations
If your business uses more than one prep station - for example, a hot section, cold section, and bar - you can view them individually or all together in the Tebi App. This helps your team stay in sync and see when each part of an order is ready.
How to choose which Prep Stations to display:
- Open the Tebi App and go to the Prep Station screen.
- At the top of the screen, you’ll see the name of the currently selected Prep Station.
- Tap the name to open a dropdown list of all available Prep Stations.
- From this list, select one or more Prep Stations you want to view.
- You can select multiple stations at once.
- The screen will now show tickets from all the selected stations.
Why this is useful:
- It allows chefs or expediters to see the full picture—who is preparing what, and when.
- It helps the team coordinate timing, so that courses are ready together and nothing is left waiting at the pass.
- It’s ideal for shared screens or when multiple team members work across stations.
- Use this feature to streamline service and ensure a smoother handoff between your kitchen stations.
Prep station - order overview
Get an overview of all the dishes that have been fired to the pep station:
- In the Tebi App go to Prep Station > click on the icon (top right)
- The overview shows the ‘Total active orders’ and ‘Oldest order’
- The List view shows a summary per product :
- See how many dishes have been ordered, fired, in preparation, ready to serve and served.
- Highlight the view by tapping on each of the statuses (e.g. clicking fired will highlight the fired column).
- The timeline view shows a summary per status:
- Click on the status to view the products.
Communicate with the Kitchen
Notes allow front-of-house staff to add multiple notes to a Sale to communicate important information like customer preference to the kitchen (e.g. allergies or dietary requirements). They can:
- Choose whether notes go to the kitchen
- Mark notes as important (highlighted in red at the prep station)
This approach improves communication and order precision during service.
Sale notes
- Open a Sale
- Open the Sale menu by tapping Untitled or the Sale/Customer name
- Tap Add a note
- Type the note and tap the tick to complete
- Tap the exclamation mark ! to make it an important note
- Tap the Chef’s hat to include the note in prep tickets
Product notes
- Tap a product(s) in sale details
- Open the edit menu by tapping the pencil
- Tap Add a note
- Type the note and tap the tick to complete
- Tap the exclamation mark ! to make it an important note
- Tap the Chef’s hat to include the note in prep tickets
Move products to other courses
You can move products to other courses in a Sale, for example if a customer wants a starter as a main. To do this:
- Add the product to a Sale in the Sales screen in the Tebi App
- Tap the product name in the sale after it has been added to the Sale
- Tap the Pen icon
- If the quantity of the selected product is more than one, use the bumper to select the amount of products you want to move
- In the Course section, select the course you want the product to move to
- Tap Done
Notifications
Enable sounds to hear a notification from the prep station when you receive new orders. You can enable sounds by going to Settings > Preferences > Sound and switch on the toggle.